Showing posts with label apricot cuticle oil. Show all posts

Friday, December 13, 2013

Neutral Greige Manicure using Ciate

Hello dear readers!!

I am so so so excited. I just got my Babyliss Miracurl in the mail today!! I used it on my mom's hair and it's so easy and amazing. I'll be doing a tutorial and review too soon. Reminds me, I never did that tutorial/review on my Sultra Curling Wand. Oh well, I'll catch up on all my hair tools soon!

It's time for another nail post. I've been working at school this past and will be working during exam week. That means that my nails will probably be destroyed by the end of it since I'm always touching things with my hands. I'm either stacking books into boxes, or stacking boxes in the closet. So you can see how hard it is for me to keep my nails nice and manicured and not broken. That's also why I chose to go with a light color for this week's manicure. I really wanted to go dark but I knew that when it starts chipping it would be a million times more noticeable on a dark color than a light color. After bugging a male friend to help me eliminate my choices down to the one, I ended up with a very light greige color. It's hard to describe the color but I like to say it's coffee with a lot of milk. That's what it makes me think of, though Ciate calls this particular color Cookies n Cream. I don't really see Cookies n Cream unless you pureed it haha.

If you've read some of my other nail posts then you know all about my usual nail routine. I like to use Essie because I find that their quality is superb. I even like Essie's top coat more than Ciate's. I've never tried OPI so you should suggest some colors for me!

All the Ciate polishes I have come from that huge 24 Days of Christmas box from last year, unless they are the Caviar Manicure sets from way back (the black and white ones). I think that last year's set had a lot more diversity in its color range compared to this year's. I like a lot of the shades and I'm always coming back to it. For those that don't have the set, I know that The Bay sells Ciate but I'm not sure about this specific color.


Neutral Greige Manicure using Ciate


Nail Prep

To prep my nails I start by removing any nail polish that's still on. Then I moisturize my nails and hands using The Body Shop's Almond Hand and Nail Cream. After my nails have moisturized for a little while I remove the excess cream. I file my nails using a Crystal Nail File I got at Sephora. I also use Sephora's 4-in-1 Nail Buffer. Then I put Essie's Apricot Cuticle Oil on my cuticles and nails too. As they're soaking I use my double-ended cuticle pusher / fingernail dirt remover manicure tool from Tweezerman's Hot Pink Nail Rescue Set to get rid of the dirt under my finger nails. Once my cuticles are soft enough, I use the other side of the tool to push them down. Then I use the Cuticle Nipper from the same set to trim my cuticles. Then I wash off the excess oil.

Polish Time

I start by applying two coats of Essie's Millionails Nail Treatment. This stuff really helps your nails to grow stronger. My nails used to be so fragile and damaged, especially after removing nail polish, but after using this product I can see a huge difference! The next step is to apply a base coat, I use Essie's Grow Stronger Base Coat because I want my nails to .... well... grow stronger! Hah! Once that's dry, I applied two coats of Ciate's Cookies n Cream. Two coats was enough to make the color opaque, you don't need a third coat. The last step is to apply a fast drying top coat, I quite like Essie's Good To Go. I put two coats just to make sure I covered every part of my nail. Since using this top coat, my nails never smudge after I've done them and they don't start chipping til over a week after I did the manicure.


The Manicure


Products Used:

Sephora Collection Mini Crystal Nail File - 10$CAD

Sephora Collection 4-in-1 Nail Buffer - 7$CAD

Sephora Collection 4-in-1 Nail Buffer - 7$CAD

Tweezerman Hot Pink Nail Rescue Kit - 24$CAD

Essie Apricot Cuticle Oil - 9$CAD

Essie Millionails Treatment - 9$CAD

Essie Grow Stronger Base Coat - 9$CAD

Ciate Cookies N Cream


Essie Good To Go Top Coat - 9$CAD


Thanks for reading! I hope you enjoyed my nail post even though it was nothing fancy. I didn't even realize that the color matched my sweater until I got home haha. What do you think of the Cookies n Cream color? I thought it looked weird when I looked at it in the pot, but when I tried it on, it totally changed my mind. It's a beautiful light greige color and it's the type of color you can wear with anything. What do you think of Ciate's nail polish line? I love Essie, I find their stuff really works from me, whether it's a treatment, top coat, or color, which is why I'm always using it lately. Is there an Essie product that you love the most? And what about your favorite Essie shade ever? I think mine would have to be Mint Candy Apple.

How do you like my little sneak peak of the next makeup look I'm planning on doing? I tried out the Makeup Forever Aqua Shadow sticks and did a look based on it. I'm still not sure if I like it cuz the colors I used are so out of my element!

Steph xo.

Sunday, November 24, 2013

Pastel Manicure using Essie (and a little review of some Essie products)

Hello ladies!

I am long overdue for a nail post. I've discovered that Essie is, so far, my favorite nail brand. I'm not that big on nails, so I haven't tried that many brands and I'm sure you all have your own opinion as to which nail polish brand is the best, but I do love my Essie polishes. I'm going to tell you a little bit about each product I use to prep my nails and why I like it so much. I know I already spoke a bit about that but I don't feel as if I really articulated my thoughts very well so here we go again. Now that I've used them quite a few times I feel that I can give a proper review. I really do prefer Essie to other brands that I've tried, though I am open to suggestion.

I'm sorry if some pics are a bit out of focus, my camera's battery was dying so I was rushing to get all my pictures done and uploaded before it died.

Want to know what my next post is going to be about? Read down til the bottom to find out!


Prep Time


As I've said before, I prep my nails by filing them with Sephora's crystal nail file. Then I use their 4 step nail buffer. Then I apply Essie's Apricot Cuticle Oil to my cuticles and nails. I let them soak for a few minutes and then I take my cuticle pusher and push them down. Sometimes I trim my cuticles, but only if it's really bad. I also make sure to clean any gunk from underneath my nails. I find that their cuticle oil is pretty hydrating and does a good job prepping them. I'm also going to mention that after I remove nail polish from my last manicure, I like to put a ton of hand and nail cream on my nails and just let them soak up and re-hydrate. I use the Body Shop's Almond Hand and Nail Cream. I really like it as both a hand and nail cream. It does a great job keeping my hands and nails moisturized. This is the first cream that actually works on my nails. So now that I've prepped my nails and cuticles, it's Essie time.


Treatment Time


I use their Millionails treatment, which is a strengthener treatment. I find it's the best one I've tried so far. When I first started doing my nails often (and I mean once a week or every 2 weeks as opposed to never), my nails were always incredibly frail after I took the polish off and would break and chip very easily. But since I've started using Millionails, my recently depolished nails are as strong as they were before I started my nail polish binge. And this also helps them to not be so darn yellow! If you do your nails often, you know that the lack of oxygen to your nails is what yellows them. I don't know what this stuff does but my nails barely get yellow anymore. It's amazing.


Base Coat Time


I also use their First Base strengthening base coat. I do like it. I can't tell if it has been strengthening my nails, but only because I started using Millionails the same time as I started using this. But I like to think that combined, they help my nails a lot. It also does a good job of prepping the nail for color. It looks like a very opaque light pink in the bottle, but it goes on clear.


Color Time


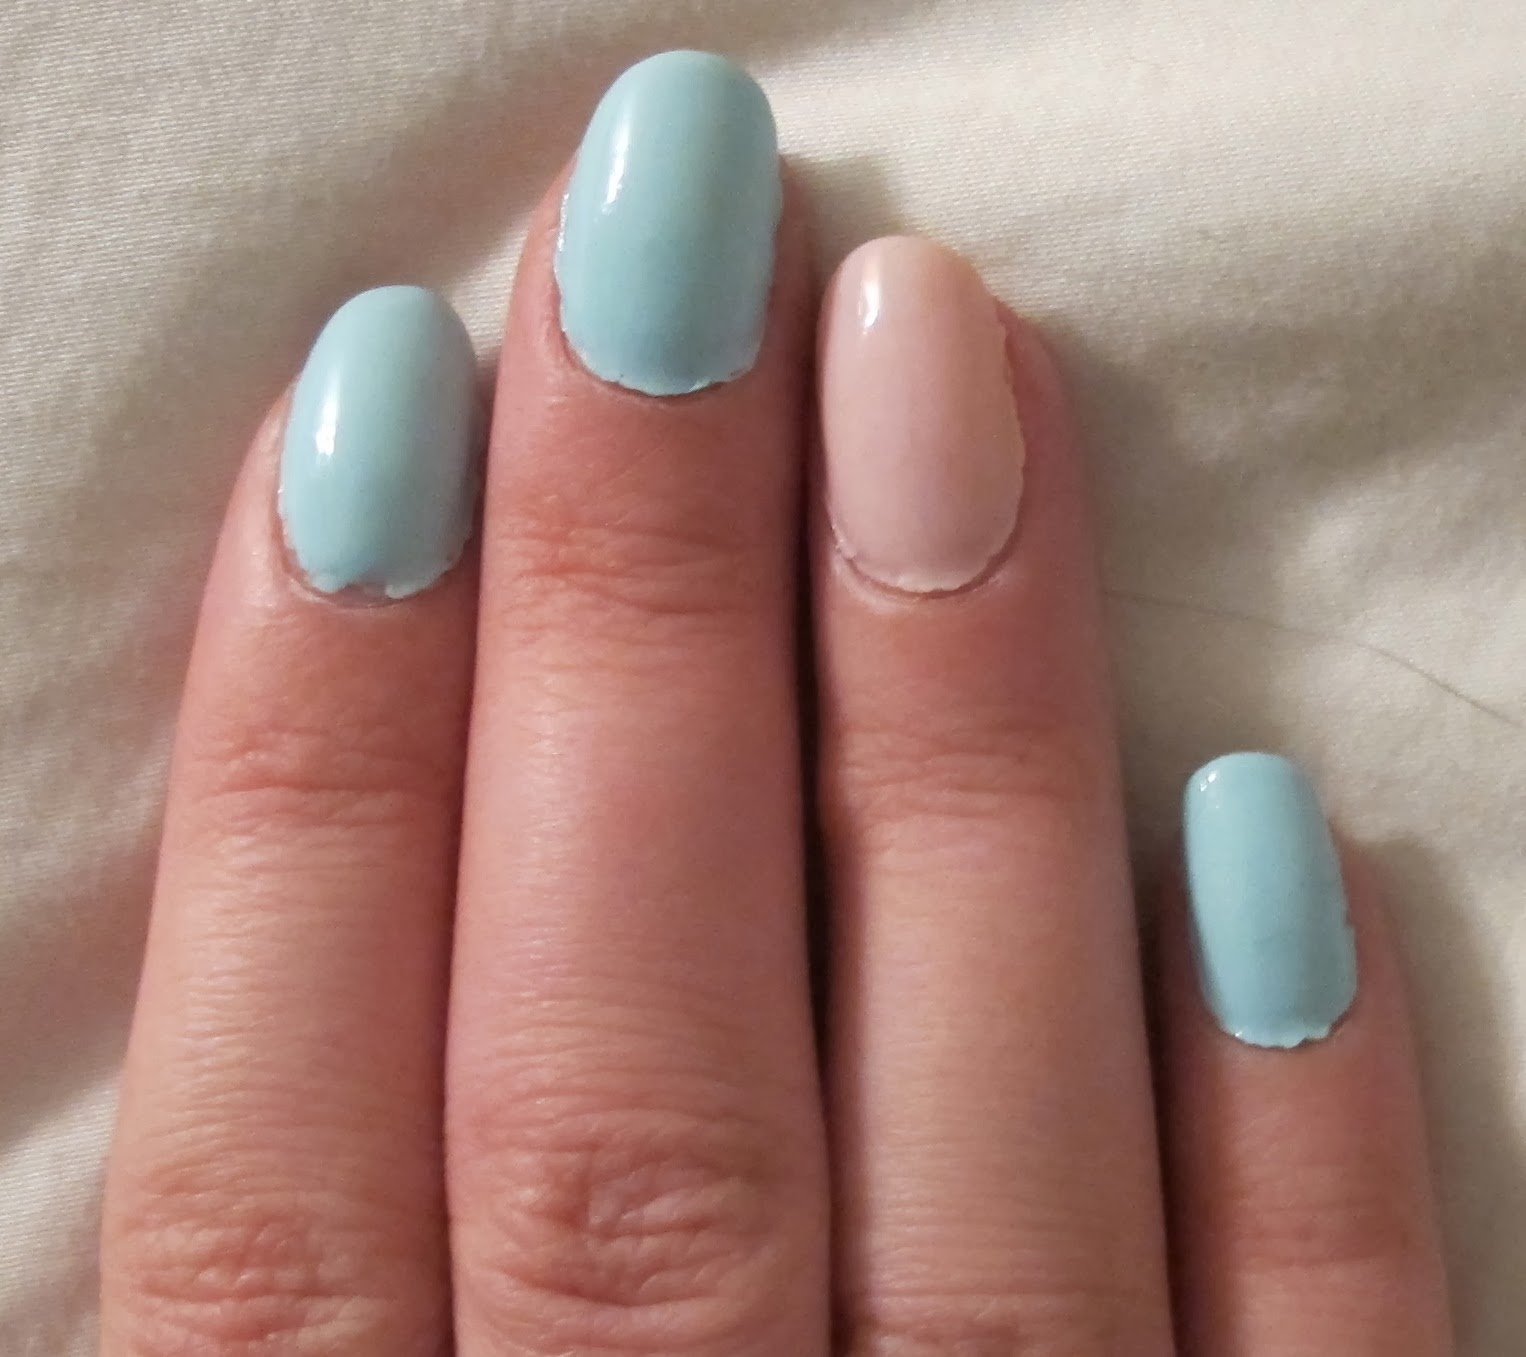
Now for the colors I used in today's manicure. I did all my nails (except ring finger) one color and my ring finger another. Cuz I'm cool like that. The main color is Essie's Mint Candy Apple. It's a very light pastel minty color. I find it's almost like a light turquoise color in the sense that it isn't strictly green, but has some blue in it as well. The polish goes on quite nice and it takes me 2 coats to get full opacity. There's something about this shade that I just love. The only thing I don't like is the small brush. It usually takes a few strokes before I get the whole nail, and sometimes it dries fast, causing streaking. The last time I used this, it lasted for over a week without a single chip. I was pretty darn impressed. The color on my ring fingers is Essie's Muchi Muchi. It's a very light pastel pink. It takes 2-3 coats for full opacity depending on how thick they are. I used two for today's. It goes on pretty sheer looking so you definitely have to put on a few coats depending on how you want it to look. It does get a little streaky so I suggest thinner coats and minimum 3 coats for full opacity. It is a very nice color once you've reached full opacity. You might be able to use this as a french manicure color if you use one coat. Even now, if I look closely, I can tell where my nail tips are. Out of the two colors, Mint Candy Apple is definitely my favorite, both color- and quality-wise.


Top Coat Time


To seal in my manicure, I use their Good To Go fast-drying top coat. Out of what I've tried, this is by far my favorite. It dries my nails and hardens them in a couple minutes after application. I do two coats to make sure that I've sealed every inch of my manicure in. Whenever I use this, my nails never smudge. It dries them very thoroughly so you don't need to worry about not touching anything. They also never chip. My manicures usually last between 1-2 weeks before I redo them, and that's only because I get annoyed with the part of the nail that has now grown out.


Products Used:


Sephora 4 Step Nail Buffer - 7$CAD

Sephora 4 Step Nail Buffer - 7$CAD

Sephora Mini Crystal Nail File - 10$CAD, and 12$CAD for fullsize

Tweezerman Hot Pink Nail Rescue Kit - 24$CAD

Essie Apricot Cuticle Oil - 10$CAD

Essie Millionails Treatment - 10$CAD

Essie Grow Stronger Base Coat - 10$CAD

Essie Mint Candy Apple - 10$CAD

Essie Muchi Muchi - 10$CAD


Essie Good To Go Top Coat - 10$CAD


My Nails:


Thanks for reading and I hope you enjoyed today's nail post! Usually I love wearing darker colors on my nails, like black, dark red, dark purples, anything dark really. I also have this random love for the color green. I gravitate to green makeup and nail polish. It's weird. I'm not one to wear pastels, like you wouldn't catch me dead in pastel colored clothes, but there's something cute about this nail color scheme. Mint Candy Apple is such a beautiful color, no wonder it's one of Essie's most popular shades. Her nail polishes go on super smooth and have a nice glossy finish. For my accent nail, I decided to stick with the pastels and do a light pink using Muchi Muchi. The colors complement each other very well. The only other time I've worn pastel nail polish (and I'm not counting when I was kid) was when I did my water marbling tutorial. I mean hello, most of my clothes are black, shades of white, browns, zebra and leopard print. Not typically a color girl, let alone pastel. But like I said, Mint Candy Apple just has something about it that I couldn't resist!!

So what do you think of Essie's Mint Candy Apple and Muchi Muchi nail polishes? What other shade(s) would you pair Mint Candy Apple with? What is your favorite Essie nail polish color? What do you think of her other products that I mentioned (treatment, top coat, etc)?

My next post is going to be my VERY FIRST DRUGSTORE HAUL!!!!

Steph xo.

Monday, October 14, 2013

French Manicure using Essie

Hello glamour girlies!

Sorry I haven't been posting much lately, been busy with school and other stuff and I'm feeling a little under the weather at the moment, but I'm going go ahead with this post anyway. I'm going to be walking you through how I do my manicures. I don't claim to be an expert by any means, I just like having nice nails, and by keeping them manicured they don't break as often, especially right at the quick. Ouch.

My mom also just bought me one of the new Too Faced Christmas 2013 sets!!!! I won't tell you which one, but I promise I will post a review and a makeup look soon!!!


Essie Nail Polishes

I've only just recently gotten into Essie polishes. And let me tell you, I've been missing out. Her polishes are amazing. They're such great quality and she has a lot of different colors in her collection. The one thing that I do think is lacking is more metallics, yellows and odd colors, neons, etc. But I do think she has a fantastic French Manicure collection out, more so than any other company I've seen.

I bought quite a few polishes to try out. In the French Manicure section, I bought Blanc and Marshmallow for the white tips. I've only tried Blanc so far and it's basically your standard white tip. I hear Marshmallow is supposed to be more see-through-ish than Blanc. Like you'd probably need two coats. For the pinks, I got Mademoiselle, which is basically the most popular color out of the whole collections, or so says the internet (it is in fact a very nice color, I tried this out first), Vanity Fairest, which is a lightly shimmered pink (which is the focus of today's manicure, the shimmer is ever so faint and it just adds a little something extra to the manicure), and lastly I got Ballet Slippers, which I haven't tried yet, but looks equally nice. I've been very impressed with the French Manicure nail polishes. So many different colors and finishes to choose from!!

For the normal color nail polishes, I bought Muchi Muchi, which is a light pink, it's a tad too thick to be a French Manicure color, but you will need more than one coat to get a nice coat of color, Mint Candy Apple, which is a light green color (and possibly my favorite), Turcs and Caicos, which is a metallic teal color, that I thought looked a hell of a lot better in the bottle than out, and Lilacism, which is a light purple. I've tried all of them except Lilacism. I tried Muchi Muchi and then on my ring fingers I put Green Candy Apple, and they looked amazing together. I got compliments all week on them. But unfortunately it got ruined before I was able to make a post (this was back when I was working everyday). But I promise that I will do a post on that someday.


How I Prep My Nails for a Manicure

I started out by filing my nails with my brand new mini crystal nail file, that I got from Sephora for about 10$CAD. I read a lot about crystal files being very good for your nails and that they last quite a while. So I thought I would at least give it a try, and I'm glad I did, because it made a huge difference on my nails. After filing I grab my Sephora 4-in-1 nail block and I continue on from 2-4, polishing my nails, etc. After that's done, I apply some of Essie's Apricot Cuticle Oil to my cuticles (I like to apply it to my nails as well) and I take my Tweezerman Cuticle Pusher and I gently push down on the cuticles. Then I take my Tweezerman Cuticle Trimmer and I trim off whatever excess cuticle I have. I don't go crazy on trimming them, I only really trim off the excess. I don't trim the whole darn thing off. Then I wash off the oil. Now it's polish time!


Nail Polish Time

I start out by using Essie's Millionails Treatment. I apply two coats of it onto my nails to prepare them for the polish. My nails get very brittle from all the nail polish and remover. I only do my nails every 2-3 weeks and they are still extremely brittle and they hurt and my nails break. But since I've been using Millionails, my nails have changed and become stronger in between manis. It really helps your nails and I recommend it if you're having the same problem as me. If not, you can skip that step. They also have products for your nails to grow faster, etc. Next, I use Essie's Grow Stronger basecoat. I apply one coat of that. I forgot to mention that in between each coat, I use my lamp as a nail heater by placing my hand as close to the lightbulb as I can without touching it. This accelerates the drying process. Now it's time for the fun stuff! Take Essie's Blanc, this is what we're using to paint the white lines. To get that nice, smooth, perfect line; make sure you apply it using one stroke. By using one smooth stroke you get a perfect line. After this dries, use Essie's Vanity Fairest for the pink. Vanity Fairest is a shimmery light pink, but the shimmer isn't that strong or visible. If you look at it in the light, you can see the shimmer, but it isn't obvious. Apply two coats of it to the entire nail. After this dries, I like to apply two coats of Essie Good To Go fast-drying top coat. This ensures that the polish is sealed and hardened and dry. So by now you should have a wonderful looking French Manicure using Essie polishes.

I also want to state that the pictures of my manicure have been taken at least 5-6 days after I did them. I haven't gotten a single chip since doing them. Sorry about the delay.


The Manicure Itself


Products Used
Sephora 4 Step Nail Buffer - 7$CAD
File and Buff sides

Sephora 4 Step Nail Buffer - 7$CAD
Polish and Shine sides

Sephora Mini Crystal Nail File - 10$CAD, fullsize is 12$CAD

Tweezerman Hot Pink Nail Rescue Kit - 24$CAD
includes: mini nail file, cuticle pushes/nail cleaner, cuticle nipper

Essie Apricot Cuticle Oil - 9$CAD

Essie Millionails Treatment - 9$CAD

Essie Grow Stronger Base Coat - 9$CAD

Essie Good To Go Fast-Drying Top Coat - 9$CAD

Essie Blanc Nail Polish - 9$CAD

Essie Vanity Fairest Nail Polish - 9$CAD


Thanks for reading and I hope this post was interesting for you! It's a little spin on the classic french manicure by using a slightly shimmery pink nail polish. I promise that the next nail tutorial won't be a french manicure haha. And yes, I am aware that my nails are growing out. Good thing I took the pics when I did, the day after I chipped a nail. I honestly don't do my nails until they start chipping really bad or I get tired of the color. What nail polishes and brands do you use for your ideal french manicure? And what is your nail care routine? I gotta say, I highly recommend getting the crystal nail file and the Tweezerman nail set. For polishes, I highly recommend Essie. This is the first brand that I've used that hasn't chipped in the first few days (since I've been using fast-drying top coats anyway). Also, the treatment and base coat are helping my nails to be stronger, which is great, because I hated how they felt so brittle after I'd take my polish off.

So again, let me know what your favorite Essie polishes are! And check back, because I'll be posting a Christmas Collection post talking about all the awesome Christmas collections coming out this holiday season. I'll also be doing a review and a makeup look using my new Too Faced Christmas Collection Palette (not sayin which one just yet!)

Steph xo.