Showing posts with label undercurrent. Show all posts

Wednesday, January 1, 2014

Not Your Typical New Year's Eve Makeup Look

Hello dolls!!

Happy 2014!!! I can't believe this year has passed by so quickly!!! I've had a lot of bad luck this year so I'm hoping that this year will get better and that stupid things will stop happening to me!! I have to say that Christmas this year was awesome, so that was a great start to my vacation. I really appreciate everything my parents have done for me this year. I've thought about my New Year's resolutions and I'm hoping that I can meat those goals that I've set for myself.

I wish I could have posted this sooner, but I kept thinking about what I wanted to do and I didn't want it to be the typical glitter smokey eye (which I love) because everyone else is doing it. I wanted it to be unique. So I decided to take a bunch of things I haven't tried and to make a look out of it. Personally, I dig it.

So without further ado, here is my New Year's Eve Makeup Look!!

And stick around til the end to see a sneak peak of tomorrow's nail post!! Here's a hint: it's my first time using this luxury brand's nail polish.


I decided that this year I would stay in with my family. Every year they watch Dick Clark's Rockin New Year's Eve and at midnight we all have a shot of some random liquor we've got in the house (my parents aren't big drinkers). It's especially cold out today so I figured, hey, why the heck not? I wasn't into having to be outside in the cold for an hour trying to flag down a taxi to get home. So what is this random look you ask? Well I got samples of pigments a loooong time ago from MAC and I decided that today would be the day that I finally play with them. I've never used pigments before so I'm sorry if it looks weird or bad. I'm still trying to get the hang of it. I started by priming my lids, as always, with Too Faced Shadow Insurance. I used Teal on my lid and Blue Brown on my crease. To apply the pigments, I wet my brushes with Urban Decay All Nighter Makeup Setting Spray because I don't have any mixing medium and I figured it would provide a better hold than water. It actually works quite well! The pigments stayed on and didn't budge at all. The colours came out looking so vibrant! I'm definitely going to start investing in more pigments because I love the way they look. I used Vanilla eyeshadow to highlight. I used Pearlglide Intense Eye Liner in Undercurrent on my bottom lash line and Kohl Power Eye Pencil in Feline in my top and bottom waterlines. I hate false lashes (they always come off; glue gets stuck in my eye; I tear up and the glue melts off; etc) so I used Too Faced Better Than False Lashes which works quite amazing!! Lastly, I did my brows, filling them in with Benefit Instant Brow Pencil in Medium.


For the rest of my face, I started by priming with Too Faced Primed and Poreless. I decided to try out some products I just got for Christmas and I got the NARS 500 Point Perk at Sephora on Boxing Day. I'll do a Boxing Day haul post when I get the rest of it in the mail. I will say I'm happy I got the NARS perk. For my under-eye concealer, I used my MAC Conceal and Correct Palette in Light. I mixed W10 and NW20 to get a lighter shade than my skin tone so I could highlight my under-eye area. Then I applied my usual MUFE HD Foundation in 110. I applied concealer in NW20 to any pimples on my forehead, around my nose, and my chin. I also went back over my eyes to highlight them. Using W10, I highlighted the top arch of my brows. I then set everything with MUFE HD Powder. I started by contouring my face with my absolute favourite bronzer, Too Faced Bronzed and Poreless. I tried out my new Chanel Joues Contraste Powder Blush in 84 Accent, which is a limited edition shade from their Winter Collection. It looks very brown in the pan, and I was worried that it would be too dark and brown for my fair skin. When I applied it, it went on as a pink brown and it actually looks very nice on me. It looks natural and is quite complementing. I think this might be a new favourite. Next, I used a few things from the NARS 500 Point Perk. I used the Illuminator in Copacabana and applied it to my cheekbones, above my brows, and on my cupid's bow. Lastly, I applied the Larger Than Life Lipgloss in Gold Digger, which is described as a "sparkling peach shimmer". It does have specks of gold glitter and it's the kind of shade that looks great on a lot of people. So that's my New Year's Eve look!


In case you were curious about the NARS 500 Point Perk, besides the Larger Than Life Lipgloss in Gold Digger (which is a mini, by the way) and the insanely small Illuminator in Copacabana, you also got a mini Orgasm blush and a mini Pro-Prime Smudge Proof Eyeshadow Base. 


Not Your Typical New Year's Eve Makeup Look


Eyes:

Too Faced Shadow Insurance
Urban Decay All Nighter Makeup Setting Spray (used instead of mixing medium)
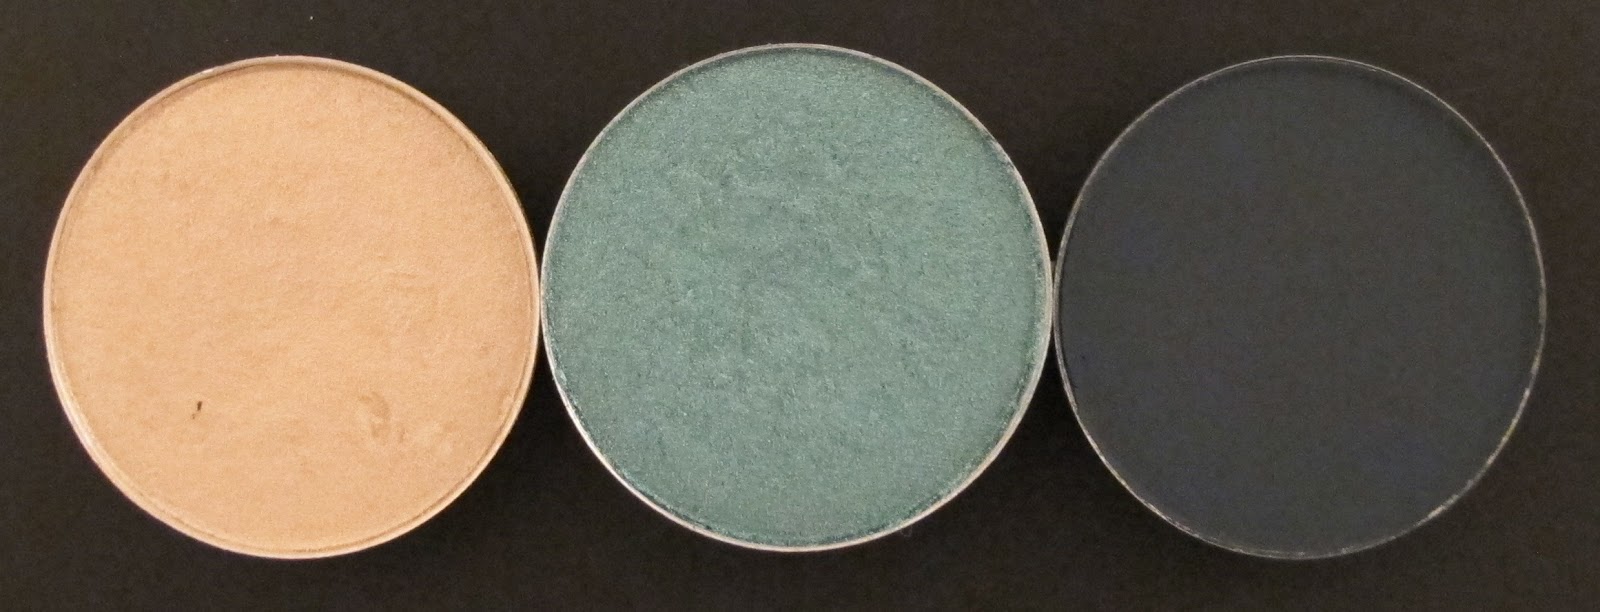
MAC Pigment in Teal
MAC Pigment in Blue Brown
MAC Eyeshadow in Vanilla
MAC Pearlglide Intense Eye Liner in Undercurrent
MAC Kohl Power Eye Pencil in Feline
Too Faced Better Than False Lashes Nylon Lash Extension System
Benefit Instant Brow Pencil in Medium


Face:

Too Faced Primed and Poreless
MAC Conceal and Correct Palette in Light, using W10 and NW20
MUFE HD Foundation in 110
MUFE HD Powder
NARS Illuminator in Copacabana
Chanel Joues Contraste Powder Blush in 84 Accent (LE)
Too Faced Bronzed and Poreless
Urban Decay All Nighter Makeup Setting Spray


Lips:

NARS Larger Than Life Lipgloss in Gold Digger


Products Used

MAC Pigment in Teal - 25$CAD for fullsize
MAC Pigment in Blue Brown - 25$CAD for full-size
MAC Eyeshadow in Vanilla - 12$CAD for just the pan, 18$CAD for the compact

MAC Pearlglide Intense Eye Liner in Undercurrent - 19$CAD

MAC Kohl Power Eye Pencil in Feline - 19$CAD

Too Faced Better Than False Lashes - 46$CAD

Benefit Instant Brow Pencil in Medium - 25$CAD

MAC Conceal and Correct Palette in Light

MAC Conceal and Correct Palette in Light - 48$CAD

NARS Illuminator in Copacabana - 36$CAD for fullsize

Chanel Joues Contraste Powder Blush in 84 Accent

Chanel Joues Contraste Powder Blush in 84 Accent - approx. 50$CAD

Too Faced Bronzed and Poreless

Too Faced Bronzed and Poreless - 38$CAD

Urban Decay All Nighter Makeup Setting Spray - 15$CAD for mini, 35$CAD for full-size

NARS Larger Than Life Lipgloss in Gold Digger - 32$CAD

Swatches:
MAC Pigment in Teal
MAC Pigment in Blue Brown
MAC Eyeshadow in Vanilla
MAC Pearlglide Intense Eye Liner in Undercurrent
MAC Kohl Power Eye Pencil in Feline
NARS Illuminator in Copacabana
Chanel Joues Contraste Powder Blush in 84 Accent
Too Faced Bronzed and Poreless
NARS Larger Than Life Lipgloss in Gold Digger


Thanks for reading and I hope you all enjoyed today's not-so-usual New Year's Eve makeup look. As much as I love love love my smokey eyes, I feel like that's all people ever wear on New Year's Eve. That, and a hell of a lot of glitter. So I changed it up and I did something really unique. I know this probably wasn't what you were expecting, but I hope that you did enjoy seeing it come together.

It was my first time using pigments, and I really enjoyed it. I love how vibrant the colours are! I just need to get some mixing medium and I'd be all set! Blue Brown reminds me of Club eyeshadow since they both have a brownish red and teal blue duo-chrome thing going on. The Chanel blush surprised me with how flattering it is on me. I was really expecting it to be some sort of weird brown, but damn it looks good! I also really liked the NARS products, Copacabana looks great on my light skin and Gold Digger is a nice neutral lipgloss. I definitely had a lot of fun playing with my new products and I can't wait to get my hands on some more pigments and some glitter too!

Here's a little sneak peak of my upcoming nail tutorial tomorrow:


It's a dark navy blue and it's by a luxury brand I haven't used before.

I'm also preparing a Best of 2013 makeup post, along with a few other things I've been wanting to get done for a while.

Steph xo.

Saturday, August 3, 2013

Exotic Teal Eyes using MAC

Hello my glamsters!!

I don't know what's wrong with me lately, but I keep having this serious love affair with the color green. I can't help it. I'm just so addicted to it. The color green makes me so happy! Today's look is more of a teal than a green, but still counts as a green in my book. I know you're probably all fed up of green and thinking "Jesus, can't this girl do something else other than green?" Well I can. And I will. Just not today. Procrastination rules!!


Since I've been buying a ton of eyeshadow lately, I've been trying to try everything out. It might take a while with the amount of stuff I've got going on. I'll try to wrap it up with the greens for a little while so I can get onto my purples and neutrals. I've pretty much finished my neutral, green, and purple palettes. Well I'd say they are mostly finished. These are my personal colors, meaning the colors that suit me the best. Now, I'm trying to move on and get colors that don't necessarily suit me into my kit so I can seriously do makeup on other people. I've really been thinking about this lately a lot and I really do want to pursue makeup as a part time job. I hear all the time from MUAs that I'd be perfect for it. And the best thing for me, not having a makeup education, would be to work at a makeup counter, or a store like Sephora. I'm trying to expand my kit to include colors I don't have, like blues, reds, oranges, yellows, pinks, yellow- and orange-toned neutrals, etc. I also need to get a whole range of foundation and concealer colors. Ahhh! So much stuff that I need.


So about the look, I tried to use a variety of colors that I haven't used before. I used MAC Paint Pot in Painterly for the first time ever. I didn't find that it did much for this look. I thought it kind of dulled out the color compared to how I normally do my eyes, especially now that I'm looking at it at the end of the day. I use Too Faced Shadow Insurance to prime my eyes normally and then I apply the eyeshadow. But today I wanted to try out the paint pot so I used that instead of the Shadow Insurance and I don't find that the color is as bright and pigmented on my eyes, especially at the end of the day. I literally see patches. This isn't normal. I feel like I can see through the shadow. I'll definitely have to play around withPainterly a bit more to find out how to use it to its full potential. On my lid, I used a color called Shimmermoss which is now discontinued. I find the color resembles Aquadisiac but Aquadisiac is more and it is also close to Steamy, though Steamy is more green. All 3 colors are very close to one another. Plumage is a very nice dark green color. It has some blue in it. It's really nice, you have to see it. On my lips I used a lipstick from the Archie Collection and a lipglass called The Wee Coquette. I looked it up after I prepared the post and photos and it is a LE shade. However, it is still available for sale on MAC's website. It's a really nice light pink.

Exotic Teal Eyes using MAC


Start off by priming your eyes using a base such as MAC Paint Pot in Painterly. Apply it all over the eye area using a large shadow brush (Sephora PRO Large Shadow Brush). You can blend out any harsh lines. Next take MAC Shimmermoss (disc.) and a medium shadow brush (Sephora PRO Medium Shadow Brush) and apply it to the lid. Now take MAC Plumage and a crease or blending brush (MAC 217) and apply it to the crease and outer V. Take it in about 2/3 of the way in. Take an angled liner brush (Sephora PRO Angled Liner Brush) and take Plumage and make a line in your crease. Keep going until you get to the end of your crease color and use it to make sure that it blends outward nicely. You want it to have a nice precise starting point. Now take MAC Shroom and a blending brush (MAC 217) and apply it above Shimmermoss and Plumage as a highlight. You can even blend into Plumage and down towards the inner eye. Now take MAC Powerpoint Eye Pencil in So There Jade and line the top lid. Also line the inner corner of the bottom lid. Take MAC Pearlglide Intense Eye Liner in Undercurrent and line the bottom lid and waterline. Take Shimmermoss and go over the bottom lid where So There Jade was applied. Do the same with Plumage and go over Undercurrent. This locks in the eyeliner and blends the color nicely. Take MAC Powerpoint Eye Pencil in Engraved and line the upper waterline. Apply MAC Zoomlash Mascara in Zoomblack to your top lashes. Draw in your brows ever so lightly using Benefit Instant Brow Pencil in Medium. Your eyes are done now! Let's do the rest of the face.


Apply a primer like Too Faced Primed and Poreless to your whole face. Apply MAC Select Cover-Up Concealer to hide your under eye circles using a concealer brush (Sephora PRO Concealer Brush). Then apply a foundation like MUFE HD Foundation to your whole face using a stippling brush (Sephora PRO Stippling Brush) or your method of choice. If there are any pimples or redness showing, apply MAC Studio Finish Concealer over them with your fingers. Use MUFE HD Powder and a kabuki brush (MUFE HD Kabuki) to set the foundation and concealer all over your face. Now it's time to contour your face using Too Faced Bronzed and Poreless and a contour brush or a powder brush that's been squished down to form a line (Sephora Collection Powder Brush). Yes I know I need a contour brush. You want to apply the bronzer to the perimeter of the face, suck in your cheeks as a guide and follow the line from the top/middle of your ear and follow it down towards your upper lip. Also apply to your temples and if you want to thin your nose, down the sides of it. Next apply Illamasqua Powder Blush in Nymph to your cheeks and blend outward and down into the contour. I skipped luminizer today. Now apply MAC Lipstick in Girl Next Door (LE) and put MAC Lipglass in The Wee Coquette on top. Now the look is done and you look fabulous!


Eyes:

MAC Paint Pot in Painterly
MAC Eyeshadow in Shimmermoss (discontinued)
MAC Eyeshadow in Plumage
MAC Eyeshadow in Shroom
MAC Powerpoint Eye Pencil in So There Jade
MAC Pearlglide Intense Eye Liner in Undercurrent
MAC Powerpoint Eye Pencil in Engraved
MAC Zoomlash in Zoomblack

Brows

Benefit Instant Brow Pencil in Medium


Face:

Too Faced Primed and Poreless
MAC Select Cover-Up Concealer in NW20
MAC Studio Finish Concealer in NW20
MUFE HD Foundation in 110
MUFE HD Powder
Illamasqua Powder Blush in Nymph
Too Faced Bronzed and Poreless


Lips:

MAC Lipstick in Girl Next Door (LE)
MAC Lipglass in The Wee Coquette (LE)


Products Used:


MAC Paint Pot in Painterly

MAC Paint Pot in Painterly - 22$CAD

MAC Eyeshadows (14.50$CAD each for palette refill) in:
Shroom
Shimmermoss (disc.)
Plumage

MAC Powerpoint Eye Pencil in So There Jade - 19$CAD

MAC Pearlglide Intense Eye Liner in Undercurrent - 19$CAD

MAC Powerpoint Eye Pencil in Engraved - 19$CAD

MAC Zoomlash in Zoomblack - mini shown, fullsize is 19$CAD

Benefit Instant Brow Pencil in Medium - 25$CAD

Illamasqua Powder Blush in Nymph

Illamasqua Powder Blush in Nymph - 26$CAD

Too Faced Bronzed and Poreless

Too Faced Bronzed and Poreless

MAC Lipstick in Girl Next Door (LE) - 18$CAD

MAC Lipglass in The Wee Coquette (LE) - 18$CAD

From left to right:
MAC Paint Pot in Painterly
MAC Eyeshadow in Shroom
MAC Eyeshadow in Shimmermoss (disc.)
MAC Eyeshadow in Plumage
MAC Powerpoint Eye Pencil in So There Jade
MAC Pearlglide Instant Eye Liner in Undercurrent
MAC Powerpoint Eye Pencil in Engraved
Illamasqua Powder Blush in Nymph
Too Faced Bronzed and Poreless
MAC Lipstick in Girl Next Door (LE)
MAC Lipglass in The Wee Coquette (LE)


Thanks for reading and I hope you enjoyed today's post!! I promise to be done with the greens/teals for a little while. I really liked Shimmermoss, though I am a fan of teals. It is similar to Aquadisiac and Steamy so I guess I can see why it's been discontinued, though they each have something special to them. Plumage is such a killer green and it's too bad it didn't appear as vibrant as it should. Maybe I put too much Painterly on?? I really wasn't impressed with it, I have to say. It crumbled after 8 hours of wear and earlier. I found that the shadow kept fading throughout the day and this has never been an issue for me before. On the other hand, when I wear Blackground Paint Pot with a Mineralize Eyeshadow it really helps the color and sparkles to adhere and I get no fading problems with it. So maybe Painterly would work better with a glitter shade. I'm still going to try to find a use for it and figure it out. Hopefully Bare Study will give me less problems.

I really do like all the eyeliners I used. I find MAC has such an incredible range of good colors. I really need to check out all their different types of liner. The Illamasqua blush in Nymph is a gorgeous pink and it's super pigmented. I love it. I also keep falling more and more in love with Too Faced Bronzed and Poreless. I used to love Pink Leopard but I'm really loving Bronzed and Poreless to give me a summer glow. And finally the MAC lipstick and lipgloss are each lovely colors. They're both light pink with blue undertones. Get these if you still can.

So I want to leave you with a few questions. Do you like MAC Paint Pots? Which is your favorite one and why? Which is your most favorite MAC Eyeshadow that has been discontinued that you would want in your hands?

Steph xo.