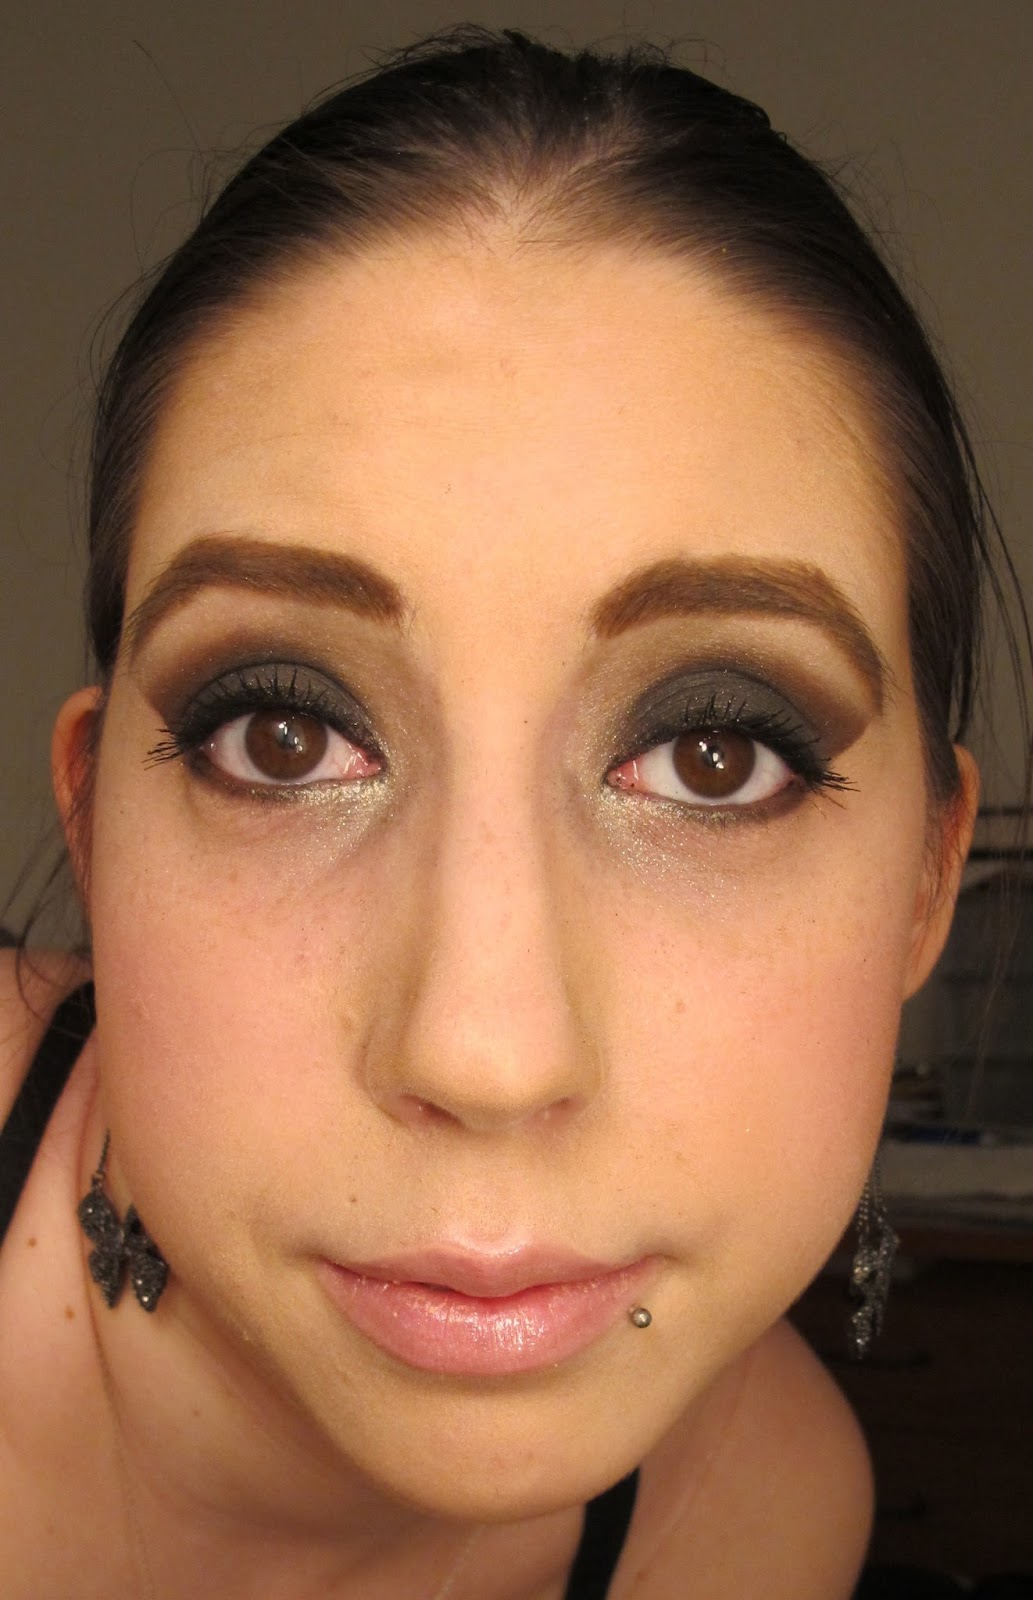
Today I'm doing yet another one of my famous smokey eyes. I always get complimented on my makeup everywhere I go. I was at the Chanel makeup counter with my mom and the SA told me she loooooved my makeup and asked if I had got it done at a nearby counter. I swear this happens to me all the time. I told her nope, don't need to, cuz I do it myself! But then they say "Oh well are you a MUA?" And I honestly wish I could say yes to that questions, but I'm just a girl trying to pursue a career in sciences. But makeup is a serious hobby for me, but nothing more, just a hobby. It's something I would like to do part-time, but it isn't a career for me. I'd like to get into it more though as a part-time job. Take a few courses and practise on people and buy a range of stuff and put out some ads. That's still a while away but it's good to hear that people like my makeup skills. I really do like this look more than the last one I did using these products. The more you blend, the nicer your look turns out. I didn't think blending a paint pot was a big deal, because I had never used one before, but it did. I have to say that I was super happy with how this look turned out and I hope you like it too.

I don't know if any of you have noticed, but I went on Sephora's site and saw that instead of VIB, I'm a "VIB Rouge". So I clicked on that to check what that is. It's a new level and it's the ultimate level you can be. There is Beauty Insider, then VIB, and lastly, VIB Rouge. To get to VIB status you had to spend 350$CAD a year and to get VIB Rouge you have to spend 1000$CAD a year. You get better perks, such as free shipping all the time (no more 75$CAD min!), free makeovers at Sephora whenever you want, free gifts, invites to exclusive events, etc. It sounds better than the crap you get as a VIB now, I just hope I actually get a free gift. I'm supposed to get a new card with coupons the next time I make a purchase at Sephora so I'll let you know what kind of coupons you get. Speaking of Sephora, I was there today and they finally got some of the new Too Faced stuff!! I saw the Pretty Rebel palette and I have to say it was nothing special. I have a lot of colors that look like dupes and similar colors. While it's great for someone that doesn't have a beauty collection or similar colors, it's not that great for the already beauty obsessed. They also had the gold glitter eyeshadow thing. Oh and they had It's Better Than Sex Mascara. That's one thing I want to try. Next time I'm around, I'll try to last the day without mascara so I can try it on! That's all they had, no Lip Injection Color Bombs :(
I also went to MAC and bought a few things. I got 3 eyeshadows: Vex, Knight Divine, and Quarry. I just got a little bit of everything to add to what I already have. I'm getting close to having what I want in my collection. I have to revamp my eyeshadow list soon. I also got an eyeliner, a Pearlglide Intense Eye Liner in Undercurrent, which is a beautiful green with a bit of teal to it. I honestly didn't know it was that nice until I swatched it. I can't wait to try this in a look, it looks amazing.

So about the look, I already did a look that was pretty much exactly like this. As to what extent, I have no idea, I didn't check. The reason why I wanted to do this over again was because I now know how to use Paint Pots better than how I was doing it before. Like after applying it to my lid, I made sure to blend it out in my crease so I don't get such a harsh line. I also didn't overapply, which lead to it smudging off when my eyes tear up. I did find that it lasted longer without using Too Faced Shadow Insurance, which is weird to me because I love Shadow Insurance and it works great with eyeshadows. But I guess not as well with Paint Pots, but that's okay. I definitely think that today's look is better than the one I did before. I used the MAC Mineralize Eyeshadow in Cinderfella pressed onto my lid because holy cow, I'm obsessed with mineralize eyeshadows ever since I first "discovered" them. I used Black Tied in the crease and outer corner to make it a bit darker than the rest of the eye, but still have some sparkle. I used Carbon last time and it was too dark and black, it needed some sparkle. MAC Pearlglide Intense Eye Liner in Black Swan is so so so beautiful! It's a black liner with sparkles and it's perfect for any smokey eye look. I love that liner. For the face, I chose Chanel Joues Contraste in 64 Pink Explosion because I wanted to bring some color into the face because I had a really dark eye. I thought this was the perfect choice for me to not end up so pale looking. That blush and contour using Too Faced Bronzed and Poreless really made the face beautiful. It's soft enough for the eyes to be the main focus. And for the lips, I used Chanel Rouge Coco Shine in 68 Candeur, which is a light pink. Again, you want to go with light pinks or nudes with a smokey eye because all the focus should be on the eyes. This is a very hydrating lipstick and it looks amazing. Now read on to find out how I did the look!
Dark Sparkly Black Smokey Eyes using MAC

Start by applying a black base to the lid like MAC Paint Pot in Blackground with a large or medium shadow brush (Sephora PRO Large Shadow Brush). This is going to act as an adhesive for the eyeshadow and it will give it a darker color. Apply it all over the lid and up to the crease. Make sure you get the inner corner of your eye as well. Now take a clean blending brush (MAC 217) and blend out the crease. Blend it until there are no harsh lines. If you need to, go back in and apply more Blackground if it has been smudged off the lid. Now take MAC Mineralize Eyeshadow in Cinderfella and push it onto the lid using a shadow brush (Sephora PRO Medium Shadow Brush). It's important to push it onto the lid so that it sticks onto the base. You don't want to sweep it on. Now take MAC Eyeshadow in Forgery and a clean blending brush (MAC 217) and blend out the black shadow just above the crease and apply it as a highlight. Now take MAC Eyeshadow in Black Tied and a crease or blending brush (Sephora PRO Crease Brush) and apply it to the crease and outer corner of the eye. Blend the crease into Cinderfella. If you need to, go back in with Forgery and blend it out. To get a nice smooth cut line on the outer sides of the eye, I take a folded piece of kleenex and some makeup remover and I wipe off the fallout and I get a nice crisp line. I rinse off the makeup remover on my face without touching the eyeshadow. Now I usually go onto the rest of the face and I come back and finish the bottom lid later. Take MAC Pearlglide Intense Eye Liner in Black Swan and line your top and bottom lids. This is a really pretty sparkly black liner, it's perfect for smokey eyes! Take MAC Powerpoint Eye Pencil in Engraved and fill in the top and bottom waterlines. Now take MAC Zoomlash in Zoomblack and apply to your top lashes and it's optional to apply to your bottom lashes as well. The last step is to fill in your brows! Using Benefit Brow Zings, fill in your eyebrows and do a dramatic arch. This will emphasize the focus on your eyes. Now you're done the eyes, let's do the rest of the face!

Start by priming your face with Too Faced Primed and Poreless. Cover your under eye circles using MAC Select Cover-Up Concealer with a concealer brush (Sephora PRO Concealer Brush) and then put on MUFE HD Foundation using a stippling brush (Sephora PRO Stippling Brush). If there are any areas of redness, or blemishes, use MAC Studio Finish Concealer to cover them up. Once you're happy with that, set your foundation and concealer using MUFE HD Powder and a kabuki brush (MUFE HD Kabuki). Contour your face with Too Faced Bronzed and Poreless using a contouring brush or a powder brush squished down into a line (Sephora Collection Powder Brush). You want to suck in your cheeks and follow the line as a guideline to contour them. Also do the perimeter of the face, temples, down the sides of the nose, and wherever else you want. Then apply Chanel Les Joues Contraste Powder Blush in 64 Pink Explosion using a blush brush (Too Faced Powder Pouf) and apply it to the apples of the cheek and sweep it outward towards the sides of your face. Make sure to blend it into the contour and blend the cheeks. Now apply a highlight, like Benefit High Beam, to the tops of your cheekbones, chin, cupid's bow, etc. The final step is to apply Chanel Rouge Coco Shine Lipstick in 68 Candeur, which is a nice light pink. You're done!

Eyes:
MAC Paint Pot in Blackground
MAC Mineralize Eyeshadow in Cinderfella
MAC Eyeshadow in Black Tied
MAC Eyeshadow in Forgery
MAC Pearlglide Intense Eye Liner in Black Swan
MAC Powerpoint Eye Pencil in Engraved
MAC Zoomlash in Zoomblack
Brows
Benefit Brow Zings in Light


Face:
Too Faced Primed and Poreless
MAC Select Cover-Up Concealer in NW20
MAC Studio Finish Concealer in NW20
MUFE HD Foundation in 110
MUFE HD Powder
Benefit High Beam
Chanel Les Joues Contraste Powder Blush in 64 Pink Explosion
Too Faced Bronzed and Poreless


Lips:
Chanel Rouge Coco Shine Lipstick in 68 Candeur

Products Used:
 |
| MAC Paint Pot in Blackground |
 |
| MAC Paint Pot in Blackground - 22$CAD |
 |
| MAC Mineralize Eyeshadow in Cinderfella |
 |
| MAC Mineralize Eyeshadow in Cinderfella - 25$CAD |
 |
| MAC Eyeshadows (14.50$CAD each) in: on the left: Forgery and Black Tied (used in this look) on the right: Electra and Carbon |
 |
| MAC Pearlglide Intense Eye Liner in Black Swan - 19$CAD |
 |
| MAC Powerpoint Eye Pencil in Engraved - 19$CAD |
 |
| MAC Zoomlash in Zoomblack - 19$CAD |
 |
| Benefit Brow Zings in Light |
 |
| Benefit Brow Zings in Light - 36$CAD |
 |
| Benefit High Beam - 32$CAD |
 |
| Chanel Les Joues Contraste Powder Blush in 64 Pink Explosion |
 |
| Chanel Les Joues Contraste Powder Blush in 64 Pink Explosion - 48$CAD |
 |
| Too Faced Bronzed and Poreless |
 |
| Too Faced Bronzed and Poreless - 38$CAD |
 |
| Chanel Rouge Coco Shine in 68 Candeur - 39$CAD |
 |
| From left to right: MAC Paint Pot in Blackground MAC Mineralize Eyeshadow in Cinderfella MAC Eyeshadow in Black Tied MAC Eyeshadow in Forgery MAC Pearlglide Intense Eye Liner in Black Swan MAC Powerpoint Eye Pencil in Engraved Benefit High Beam Chanel Les Joues Contraste Powder Blush in 64 Pink Explosion Too Faced Bronzed and Poreless Chanel Rouge Coco Shine in 68 Candeur |

Thanks for reading and I hope you enjoyed today's post and that it wasn't too repetitive!! I really do think that I did a much better job this time around, now that I've got the hang of MAC Paint Pots and Mineralize Eyeshadows!! I thought this look was absolutely stunning. Everyone complimented me on my makeup. Smokey eyes have definitely always been my thing, ever since I was a young teenager. I'm wondering, do you think I pulled it off better this time or last time? What do you think of the look? What is your favorite MAC Paint Pot and fav MAC Mineralize Eyeshadow? I'm also wondering what your favorite MAC Pearlglide Intense Eye Liner is. I love Black Swan and I just bought Undercurrent and it's such a nice color. I'm also wondering which Chanel blush is your fav and if you liked the one I use and same thing with their Rouge Coco Shine lipsticks. I have to say that I love all the products I used and I do use them quite often. I've got a lot of new favorites.
Coming up soon:
Empties and Extras #2
Too Faced Loves Sephora Dupe List
New Haircut and How to Style It
... and plenty more!
Steph xo.