I have a special treat for you all today! Makeup on a face that isn't mine. Hah. My amazing best friend Lisa came over to my house today and we had a girly day that consisted of me doing her makeup and watching Orange is the New Black in the background. I've known Lisa since kindergarden and she's basically like a sister to me. I don't think she knows how much I appreciate her and love her and cherish our friendship. So enough sappy stuff, what about the makeup? I told her to look through all my palettes and to pick out the direction she wanted the look to go in. Secretly, I was kind of hoping for something fun, but knowing Lisa, she went for natural. I'm not saying this is a bad thing, I just happen to like doing dramatic and outrageous makeup, but I know that isn't Lisa. She doesn't wear a lot of makeup to begin with so I have to start slowly with her. Taking baby steps. Lol. She wanted a look that she could wear to work and school that is natural.

She picked out Too Faced Natural Face palette, specifically the Day Look. I've already done that look, link is at the bottom. I've done the classic look as well, which you can also find at the bottom. The fashion look from the palette is on it's way. She also picked the Too Faced Secret to No Makeup Makeup. I didn't follow the cards in it and instead used it how I felt it should be used. If you want to see my post following the 3 different looks from the No Makeup Makeup palette, again, check the bottom. Those two palettes contributed to most of the look and I gotta say, she looked fantastic!! She wanted to try the Too Faced Better Than False Lashes Nylon Extension System because come on, it's just that cool. She had a lot of fun with it. I used her concealer and foundation, since I don't yet have a set of different concealer and foundation colors. We set it with MUFE HD Powder and we had primed her eyes with Too Faced Shadow Insurance and her face with Too Faced Primed and Poreless. And for lipstick, I used Chanel Rouge Coco Shine in 68 Candeur.

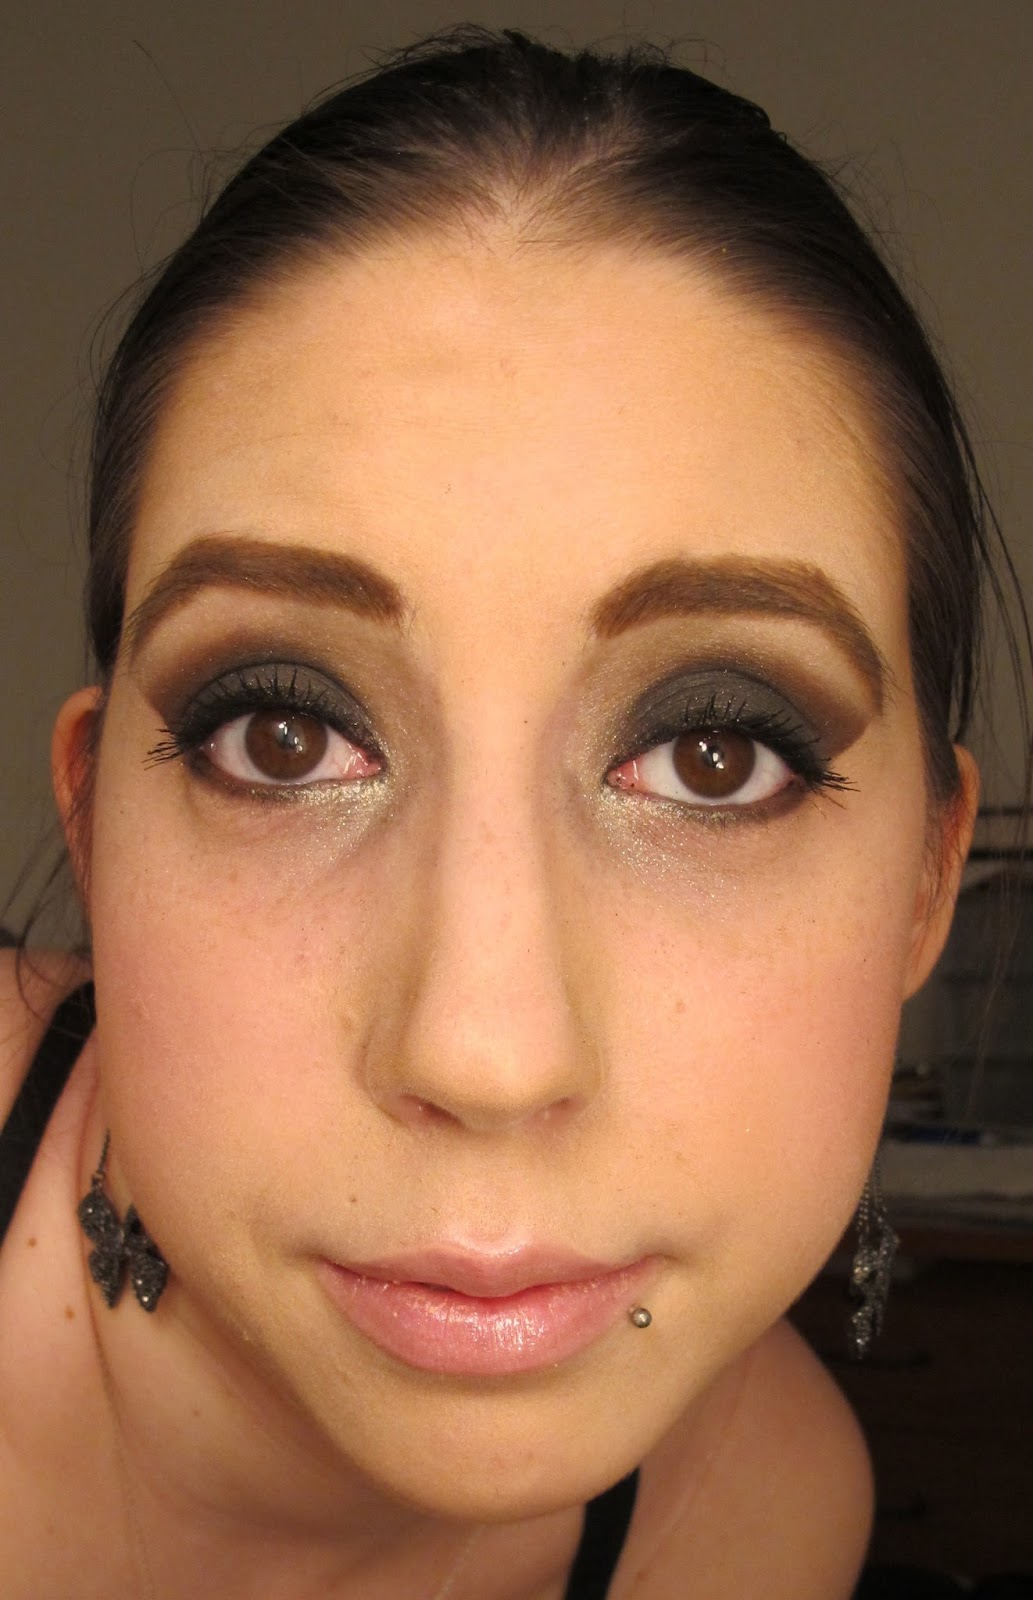
She loved the look. It looks very effortless and classy without looking like we spent loads of time on it. I think she looks wonderful and vibrant. This is something I can see her wearing to school and work. I think she looks marvellous.
I'm listing all the products and brushes and showing pictures of everything, which is not something that I normally do. Lisa wanted me to include everything in this post so she can look back on it and decide what products she would like to purchase. There are no prices listed for the Sephora brushes, I got mine on sale as a set for a fraction of the price. The set came with 15 brushes and a makeup artist brush belt. The initial price was 360$ and I got it on sale for 100$. I literally dreamt about these brushes for years. The only reason they were put on clearance was because they launched their new Pro brush collection.
Natural Makeup using Too Faced on my model, Lisa!

Start by applying Too Faced Shadow Insurance all over the eye, from lashes to brow, using your fingers. We're using the Too Faced Natural Eye palette for this look. Take either a medium or large shadow brush (Sephora PRO 12 Large Shadow Brush) and apply Heaven all over the eye area, from your lashes all the way up to your brow, including your tear duct area. This is our base color. Now take a crease or blending brush (MAC 217 Blending Brush) and Velvet Revolver and apply it to the crease and outer V. You want to blend it in being careful not to create any harsh lines. Now take an angled liner brush (Sephora PRO 22 Angled Liner Brush) and Sexpresso and apply it to your lash line. Follow the V we created earlier and create a slight cat eye wing going up. You want it to go up so that it gives the appearance of lifting your eyes. If you slant it down, it will make your eyes look like they're drooping. You don't want that. I like to continue with the rest of the face, especially concealer, and then come back and do the bottom lid. For the bottom lid, take a smokey eye brush (Sephora PRO 24 Smokey Eye Brush) or whatever you have, like a pencil brush, and apply Velvet Revolver to your bottom lash line. You don't want to create a stark line (like we did for the top lid) but rather a smokey and blended out line. We didn't want it to be too dark, but if it's too light for you, just go in with an angled liner brush and Sexpresso. I thought the way we did it was very soft and natural looking. Lisa wanted to try out the Too Faced Better Than False Lashes mascara so I used that on her eyes. I normally do 2 coats of mascara, 1-2 coats of nylon fibers, and another 2 coats of mascara. She already has beautiful long lashes but this mascara added an extra oomph to this otherwise natural everyday look. The eyes are done, so let's get on to the rest of the face!!
We started by priming the face with Too Faced Primed and Poreless. This helps to refine pores and it creates a nice smooth canvas to work on. i find it also lessens the amount of foundation and concealer I use. After applying this to the whole face with my fingers, I applied Sephora Perfect Cover Concealer using a concealer brush (Sephora PRO 45 Concealer Brush) to her under eye circles. Then I took Sephora Instant Radiance Foundation and I applied this to her entire face using a foundation brush (Sephora PRO 47 Foundation Brush). I set the foundation and concealer using MUFE HD Powder and a kabuki brush (MUFE HD Kabuki Brush). You want to make sure you do dabbing motions and not rubbing. The point is to set the foundation on, not rub it off! Next, I started by contouring her cheeks using the bronzer from the Too Faced Secret To No Makeup Makeup Palette and a powder brush (Sephora Collection Powder Brush) because I still haven't got a contouring brush. I had her suck in her cheeks (basically do the duck face) and I used that as a guide. I followed the line from the middle of her ear down towards her upper lip. I also applied bronzer to her temples, chin, and perimeter of her face. Next I took the powder blush from the palette and using a blush brush (Too Faced Petite Pouf) I applied it to the apples of her cheek and I blended it outward and also down into the contour. You want to make sure it is well blended (same goes for the bronzer) and make sure you don't end up with any stark lines. If it's too dark, just go over it with some powder on your kabuki brush and blend it out. I used the luminizer from the face palette and I applied it to the tops of her cheekbones and the cupid's bow of her lips. I applied a bit of powder on top to reduce the shine and to make it look more natural looking. The last step is to apply a lipstick, I chose Chanel Rouge Coco Shine in 68 Candeur, which is a light pink color. I love the formula, it's very soft and hydrating, and especially nice to your chapped lips. So this is the finished look!
Eyes
Too Faced Shadow Insurance
Too Faced Natural Eye Neutral Eyeshadow Collection
- Heaven
- Velvet Revolver
- Sexpresso
Too Faced Better Than False Lashes Nylon Lash Extension System

Face
Too Faced Primed and Poreless
Sephora Perfect Cover Concealer in Light 10 Ivory
Sephora Instant Radiance Foundation in Light 15 Nude
MUFE HD Powder
Too Faced The Secret to No Makeup Makeup Face Palette
- Luminizer
- Powder Blush
- Bronzer


Lips
Chanel Rouge Coco Shine Lipstick in 68 Candeur

Brushes
Sephora PRO 12 Large Shadow Brush
MAC 217 Blending Brush
Sephora PRO 22 Angled Liner Brush
Sephora PRO 24 Smokey Eye Brush
Sephora PRO 43 Fan Brush
Sephora PRO 45 Concealer Brush
Sephora PRO 47 Foundation Brush
MUFE HD Kabuki Brush
Too Faced Petite Pouf
Sephora Collection Powder Brush
Products Used
 |
| Too Faced Shadow Insurance - 24$CAD |
 |
| Too Faced Natural Eye Neutral Eyeshadow Collection |
 |
| Too Faced Natural Eye Neutral Eyeshadow Collection - 45$CAD |
 |
| Too Faced Better Than False Lashes Nylon Lash Extension System - 46$CAD |
 |
| Too Faced Primed and Poreless - 38$CAD |
 |
| MUFE HD Powder - mini (shown) is 19$CAD, fullsize is 39$CAD |
 |
| Too Faced The Secret to No Makeup Makeup |
 |
| Too Faced The Secret To No Makeup Makeup - 48$CAD |
 |
| Chanel Rouge Coco Shine Lipstick in 68 Candeur - 39$CAD |
Swatches
Brushes

Thank you for reading and I hope you liked seeing me do makeup on someone that isn't me for once. I had her pick out what she wanted to do and she wanted a very natural look that she can wear to work and school. She reads my blog and liked the Too Faced products I was using, so we used that to create her natural look. I think it looks fantastic and it will make everyone turn their heads. I honestly think this looks fabulous on her.
I've done swatches of the complete palettes, along with listing pictures and prices of everything I used, including brushes, so it's easy for her and you to find the products that you need to recreate this look.
Before I leave you, I want to know what you think of the look. Would you wear this to school and work? I know I'm a big fan of Too Faced products, but what do you think of them? And what is your favorite palette from them?
Here are some links to some more looks from the Too Faced palettes I used:
Day Look using Too Faced Natural Eye Palette
Classic Look from Too Faced Natural Eye Palette
Too Faced Boudoir Eyes and the Secret to No Makeup Makeup (3 different looks)
Steph xo.
 |
| Too Faced Natural Eye Neutral Eyeshadow Palette Day Look: Heaven, Velvet Revolver, Sexpresso Classic Look: Silk Teddy, Push-Up, Erotica Fashion Look: Nude Beach, Honey Pot, Cocoa Puff |
 |
| Too Faced The Secret to No Makeup Makeup Concealer Luminizer Brightener Creme Blush Powder Blush Bronzer |
| Sephora PRO 12 Large Shadow Brush |
| MAC 217 Blending Brush |
| Sephora PRO 22 Angled Liner Brush |
| Sephora PRO 24 Smokey Eye Brush |
 |
| Sephora PRO 43 Fan Brush |
| Sephora PRO 45 Concealer Brush |
| Sephora PRO 47 Foundation Brush |
 |
| MUFE HD Kabuki Brush |
 |
| Too Faced Petite Pouf Brush |
 |
| Sephora Collection Powder Brush |
Thank you for reading and I hope you liked seeing me do makeup on someone that isn't me for once. I had her pick out what she wanted to do and she wanted a very natural look that she can wear to work and school. She reads my blog and liked the Too Faced products I was using, so we used that to create her natural look. I think it looks fantastic and it will make everyone turn their heads. I honestly think this looks fabulous on her.
I've done swatches of the complete palettes, along with listing pictures and prices of everything I used, including brushes, so it's easy for her and you to find the products that you need to recreate this look.
Before I leave you, I want to know what you think of the look. Would you wear this to school and work? I know I'm a big fan of Too Faced products, but what do you think of them? And what is your favorite palette from them?
Here are some links to some more looks from the Too Faced palettes I used:
Day Look using Too Faced Natural Eye Palette
Classic Look from Too Faced Natural Eye Palette
Too Faced Boudoir Eyes and the Secret to No Makeup Makeup (3 different looks)
Steph xo.