Showing posts with label green smokey eyes. Show all posts

Friday, August 2, 2013

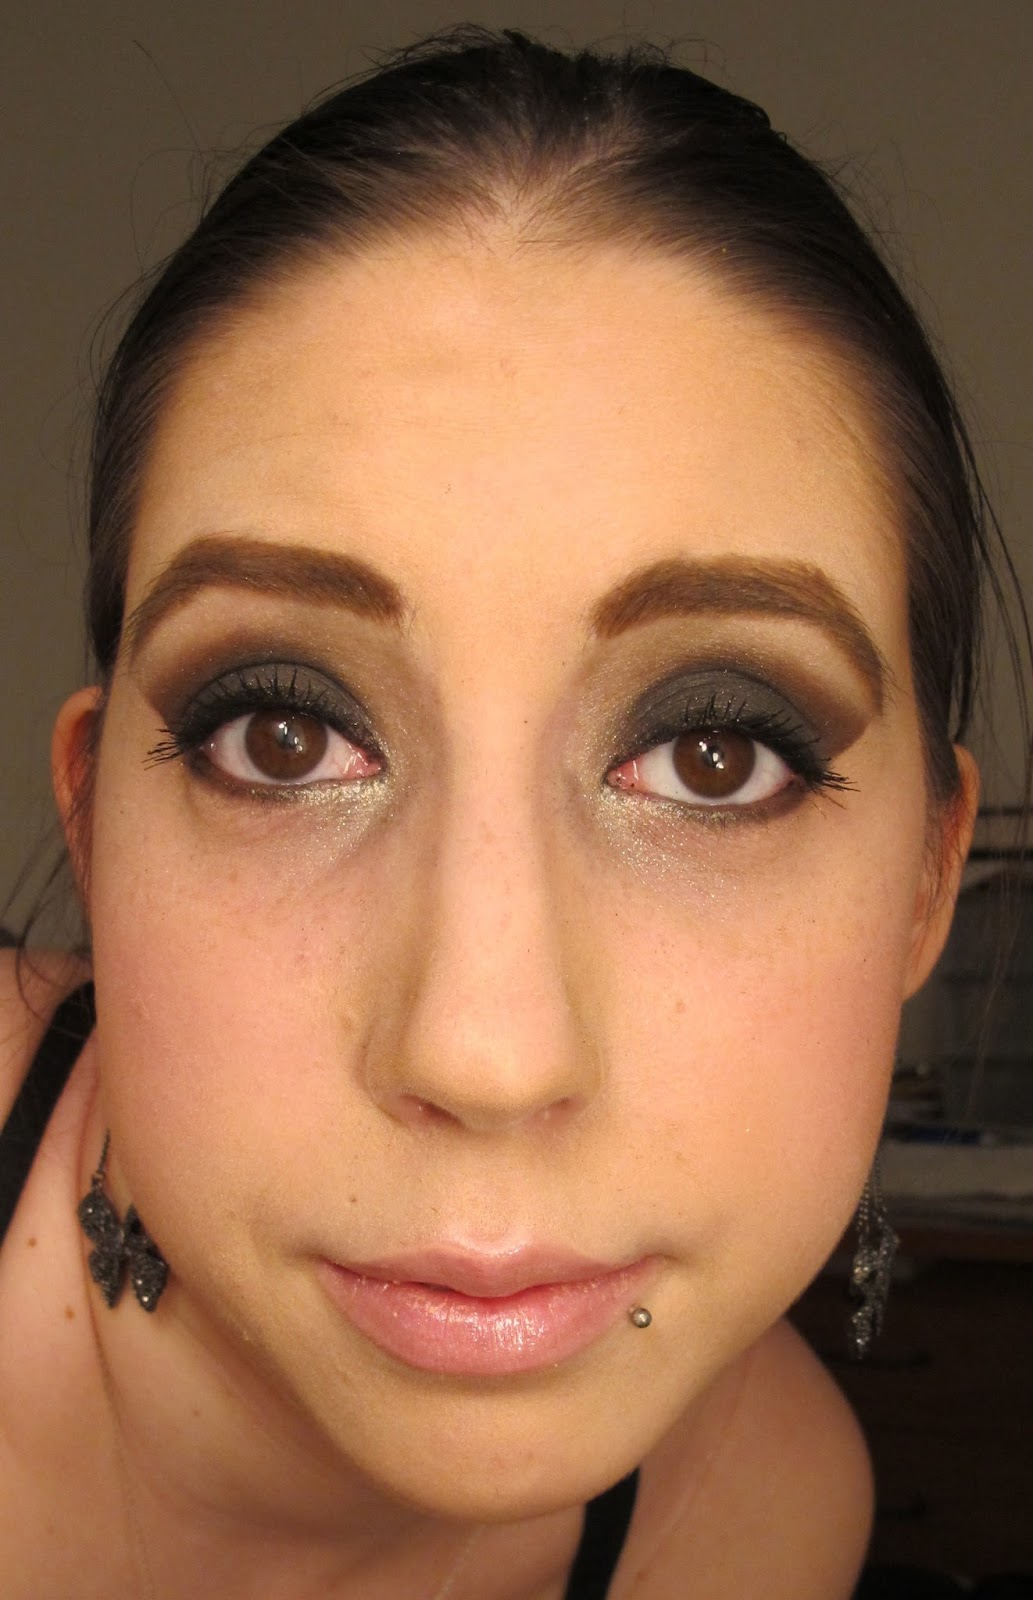
Dark Smokey Sparkly Green Eyes using MAC

Hello glamies!!

Well, this look certainly can't get any smokier. I seriously went insane and made it so smokey and dramatic. What I love about it is that it isn't your typical smokey eye, it's a dark green smokey eye that just looks stunning. I know I did a similar look on my mom, but I changed up mine completely and it looks awesome. I've only recently discovered MAC's Mineralize Eyeshadow line but I am hooked. I love love love the sparkle payoff and the fact that it actually sticks to the skin when used with a proper base. I find a lot of sparkle shadows just end up falling down and no sparkles actually stick to the eyelid. No such problems with Mineralize Eyeshadows!! Just make sure you use MAC's Paint Pots beforehand, they really make a big difference in creating a sticky base that your eyeshadow and sparkles will adhere to. Since I started using Paint Pots in the last month, I've noticed a dramatic increase. I can wear my makeup longer without it creasing!! And the color stays vibrant and as sparkly as it did upon application. I used to use Too Faced's Shadow Insurance, but I find that for anything with sparkles, you need a stronger, stickier base for it to adhere to. I also tried using Shadow Insurance before applying my Paint Pot, but I found that it made it worse! I'm guessing because it ends up slipping all over the eye?? But since I started using Paint Pots as my sole primer, I've seen a huge difference. I tend to have watery eyes and my makeup always comes off in my inner corner and going up along into the crease. Today, after 12 hours of wear, the tiniest bit of makeup in my inner corner came off. Not bad considering my lids. I'll stop rambling and get onto the look, but seriously, I love those 2 products.


Now, the trick to this look is blending. You can never blend too much.

As a sidenote, my mom went and bought some makeup for herself which I ended up stealing. She got the MAC Illustrated Face Kit by Rebecca Moses in Plum. So jeals! If I had to pick between the plum and the brown I would definitely take the plum. I found the colors were much better and also more suited to me. In this kit you get 4 eyeshadows, 1 blush, 2 lipsticks, and a double-ended brush. I'll post pics of it in an upcoming tutorial. I can't wait to use it!! She also got a couple lipsticks, I know one of them is Pervette which is her favorite lipstick ever. She got me an eyeshadow, Plumage, which is such a beautiful green. She also got Ricepaper and Sketch because she wanted to try out a look to bring out the green in her hazel eyes. She'd be using those 2 and Fig.1 which I already have. They're being housed in my palette of course. She also got me another 217 brush!! I knew mine was mangled but holy crap when I put the two together, mine was clearly shorter and fatter.Oh well, I'm still keeping it because I wanted to have two to use at the same time. She also went to Illamasqua and bought the lipgloss I was dying to buy. For herself. She kills me sometimes. It's an Intense Lipgloss in Divine. It's a bright almost neon pink and it looks bad ass. And anyways, onto the makeup look!


Dark Smokey Sparkly Green Eyes using MAC


Start by applying a dark base, I like MAC Paint Pot in Blackground because it's sticky enough for the sparkles and color from the Mineralize Eyeshadow in Smutty Green to stick on and stay the whole day. Apply this base to the lid and crease using a large shadow brush (Sephora PRO Large Shadow Brush) and make sure you get the inner corner. Take a blending brush (Sephora PRO Crease Brush) and blend out your crease. Keep blending until there are no harsh lines. If you have to, go back in and put more Blackground on your lid if it faded during blending. Again, if you get a harsh line, blend it out gently. Now take Mineralize Eyeshadow in Smutty Green and pat it onto your lid using a medium shadow brush (Sephora PRO Medium Shadow Brush). Take a blending or crease brush (MAC 217) and apply MAC Eyeshadow in Greensmoke to your crease and bring it into your inner corner. Next take MAC Eyeshadow in Vex, and using a small shadow brush (Sephora Collection All Over Shadow Brush), apply this under your brow and bring it into the corner of your eye and also use it so blend out Greensmoke. I like to go back in and blend Greensmoke again and also apply another coat of Smutty Green on my lid to make it more sparkly. For the bottom lid, I lined it with MAC Pearlglide Intense Eye Liner in Undercurrent and then I went over that with MAC Mineralize Eyeshadow in Smutty Green. I lined both top and bottom waterlines with Too Faced Perfect Eyes in Perfect Black for an extra black waterline. Finish your eyes off with a couple coats of MAC Zoom Fast Black Lash in Black. For your brows, use Benefit Brow Zings and Benefit Instant Brow Pencil to fill in your brows and create a dramatic arch so people are drawn into your captivating eyes.


Now it's time to do the rest of your face. Prime your face using Too Faced Primed and Poreless. Cover up your under eye circles with MAC Select Cover-Up Concealer in NW20 using a concealer brush (Sephora PRO Concealer Brush) and apply a foundation such as MUFE HD Foundation with a stippling brush (Sephora PRO Stippling Brush) or your method of choice. Go over any imperfections with MAC Studio Finish Concealer. Once you're happy, apply MUFE HD Powder all over your face using a kabuki brush (MUFE HD Kabuki). To contour, I used Too Faced Bronzed and Poreless with a folded powder brush (Sephora Collection Powder Brush). Suck in your cheeks as a guideline and go from the top of the ear towards the upper mouth. Also contour the perimeter of the face, the temples, the sides of the nose, etc. Apply Illamasqua Powder Blush in Nymph and a blush brush (Too Faced Powder Pouf) to the apples of your cheek and blend outwards as well as down into the contour. Apply a highlight, like Benefit High Beam, to the tops of your cheekbones, top of your brow bones, cupid's bow, etc. The finishing touch is to apply Illamasqua Lipstick in Plunge.

Eyes:

MAC Paint Pot in Blackground
MAC Mineralize Eyeshadow in Smutty Green
MAC Eyeshadow in Greensmoke
MAC Eyeshadow in Vex
Too Faced Perfect Eyes in Perfect Black
MAC Pearlglide Intense Eye Liner in Undercurrent
MAC Zoom Fast Black Lash in Black

Brows

Benefit Brow Zings in Light
Benefit Instant Brow Pencil in Medium


Face:

Too Faced Primed and Poreless
MAC Select Cover-Up Concealer in NW20
MAC Studio Finish Concealer in NW20
MUFE HD Foundation in 110
MUFE HD Powder
Benefit High Beam
Illamasqua Powder Blush in Nymph
Too Faced Bronzed and Poreless


Lips:

Illamasqua Lipstick in Plunge


Products Used:


MAC Paint Pot in Blackground

MAC Paint Pot in Blackground - 22$CAD

MAC Mineralize Eyeshadow in Smutty Green

MAC Mineralize Eyeshadow in Smutty Green - 25$CAD

MAC Eyeshadows (14.50$CAD each for palette refill) in:
Vex
Greensmoke

MAC Pearlglide Intense Eye Liner in Undercurrent - 19$CAD

Too Faced Perfect Eyes in Perfect Black - 25$CAD

MAC Zoom Fast Black Lash in Black - 19$CAD

Benefit Brow Zings in Light

Benefit Brow Zings in Light - 36$CAD

Benefit Instant Brow Pencil in Medium - 25$CAD

Benefit High Beam - 32$CAD

Illamasqua Powder Blush in Nymph

Illamasqua Powder Blush in Nymph - 26$CAD

Too Faced Bronzed and Poreless

Too Faced Bronzed and Poreless - 38$CAD

Illamasqua Lipstick in Plunge - 24$CAD

From left to right:
MAC Paint Pot in Blackground
MAC Mineralize Eyeshadow in Smutty Green
MAC Eyeshadow in Greensmoke
MAC Eyeshadow in Vex
MAC Pearlglide Intense Eye Liner in Undercurrent
Too Faced Perfect Eyes in Perfect Black
Benefit High Beam
Illamasqua Powder Blush in Nymph
Too Faced Bronzed and Poreless
Illamasqua Lipstick in Plunge


Thanks for reading and I hope you enjoyed the look! This was my own personal take on the look I had done for my mom. I just wish she would have let me post a pic of the whole look, it looked great! And I also love how mine turned out. I'm really a big fan of Mineralize Eyeshadows, I love the sparkle in them! I can't wait to try out the purple one I got, Young Punk. The green liner was also super beautiful. You really have to swatch Undercurrent to be able to see how beautiful it is. It's a color I've always overlooked until I decided to actually swatch all the green liners. I love it.

You can expect to see new posts coming soon where I'll be using a ton of the new stuff I got! Time to mix and match the new with the old! I'm still on my quest to to build the ultimate palette collection, so I want to know: What is your top 15 MAC eyeshadows? Basically, if you could build your own palette with your favorite shadows, what would they be? I'll be doing a post soon on my favorite picks, as I think it's interesting to see what different people consider their staple products.

So anywayz, hope you loved the look, as always you can comment and say what you loved or didn't love about it. I also want to hear which paint pot is your favorite and why.

Steph xo.


Friday, July 19, 2013

Dark Smokey Green using new MAC Veluxe Pearl Fusion Eyeshadow in Smokeluxe

Hey gorgeous glamsies!!

I had an awesome day today. It's hot as hell here (still 30+C) but I wanted to finally do this look for you. I have to say that Greenluxe from MAC's new Veluxe Pearl Fusion Eyeshadow Collection is my favorite!!! It's not what you'd typically think of when you hear the word green. There are a lot of dark green colors. One of them is a dark olive green with a ton of sparkles and another resembles MAC's Club Eyeshadow. You get a light green color with is good for a highlight color, You get a white sparkly color, which I like to put in the inner corners of my eyes to make them look bigger. The last color is a very light neutral beige color that I use under my brow bones to accentuate them. I also own Smokeluxe and I really do prefer Greenluxe. The MUA's at MAC all told me they loved Greenluxe. They also told me that MAC made these PERMANENT!!


Last night I did my nails and I did a Matte Black French Manicure (with Glossy Tips) and it looks pretty good. It's not as amazing as the pictures that you see online. Let's be honest, I'm not the greatest at nail designs. I think I managed to do a half decent job. I'm going to have a post on my nails coming up soon, so you can see how I did them and what I used. I won't be showing off both my face and nails together because I forgot to take pictures and it's too late now because I took my makeup off.

I also went to the MAC PRO store today and woah. Just woah. I don't usually go to the Pro store because there isn't much else to see in the area. I usually just go to Ogilvy for my MAC products, because they sell palettes there and pan (refill) eyeshadows for your palettes. It's basically a step below MAC PRO and the counter at The Bay would be at the bottom of the 3 steps. So of course being at MAC PRO, I had to check out the Pro Eyeshadows. I have to say that the Pro shadows are really their own unique color. They look nothing like the rest of the shadows in their permanent collection so I don't understand why they don't sell these everywhere. Long story short, I bought 5 Pro Eyeshadows and 1 Eyeshadow that's in their permanent collection. I also picked up another Double Palette because mine's full and I got one eyeshadow insert because I'm not sure what I'll do with the other side just yet. I'll do a post on my MAC PRO haul so you can see all the awesome eyeshadows I bought.


I also went to check out our first ever Illamasqua counter! They have a counter at The Bay in their downtown store. They don't have a counter yet, per se, but they do have a tiny area right now. They don't have all the products out, but they will be having an opening event on August 8, when they get their counter. I'm excited, I can't wait to see their full range of products! Their blushes are so pigmented that I seriously have to go back and buy one. Their lipglosses and lipsticks also come in a lot of nice colors. Their nail polishes are also pretty awesome and come in all sorts of colors and finishes. Unfortunately I didn't buy anything, but that will probably be my next haul.

I also went to check out NARS and the MUA showed me the Fairy's Kiss Palette from the Fall 2013 Collection (which isn't even out yet) and oh my goodness. It's such a nice palette and it has my type of colors!! I want it so bad. I also saw the other one, I forget the name, it was nice but it wasn't my thing. But definitely check out Fairy's Kiss when it's released, it's actually amazing. The picture doesn't lie. This palette is on my wishlist, someone please buy it for me?

So now back to today's makeup look, I used all 5 eyeshadows in this look. Some more than others. I also went light on the face and lips because I really wanted the eyes to stand out.


Dark Smokey Green using new MAC Veluxe Pearl Fusion Eyeshadow in Greenluxe


Always start by priming your eyes. I used Too Faced's Shadow Insurance. I find that you need a stickier base, so you can use a MAC Paint Pot or whatever else you have. If you want it to be dark, use MAC Paint Pot in Blackground. I'm going to refer to the shades in the MAC Veluxe Pearl Fusion Eyeshadow in Greenluxe as numbers (ex. 1,2,etc) to make it easier, since they don't have names. Using a medium eyeshadow brush (Sephora PRO Medium Eyeshadow Brush), take #4 and press it onto the lid except for the outer corner and go up to the crease. Next take a fluffy blending brush (MAC 217) and take #5 and apply it to your crease and bring it down into your outer lid. Using a clean blending brush take #3 and blend out #5 and also apply it as a highlight, basically everywhere where there isn't color already. Then taking a small shadow brush (Sephora Collection All Over Shadow Brush), take #1 and put it under your brow bone to really highlight it. Taking a small smudge brush (Stila 28) and #2 and apply it to the inner corners of your eyes. Also apply it to the inner part of your lower lid as well. I like to do the rest of my face and come back to the bottom lid later. So for the bottom lid just take #5 on an angled brush (Sephora PRO Angled Liner Brush) and apply it on your lower lid, leaving the inner corners empty of course. Now take a black eyeliner pencil like Too Faced's Perfect Eyes in Perfect Black and do the waterlines of both your top and bottom lids. Next take MAC Fluidline in Blitz and Glitz using a thin eyeliner brush (Stila 28) and apply it to the lid. You want to put a thin line, just enough to define your lid. Take a volumizing mascara like MAC Zoom Fast Black Lash in Black and apply it to your top lashes. Now you just have to fill in your brows. I use Benefit Brow Zings in Light. Now your eyes are done, let's move on to the face!

Prep your face using Too Faced Primed and Poreless. Apply your under eye concealer, like MAC Select Cover-Up Concealer with a concealer brush (Sephora PRO Concealer Brush) and then put on your foundation like MUFE HD Foundation with a stippling brush (Sephora PRO Stippling Brush). Next cover any blemishes or redness that is still showing through using MAC Studio Finish. I use my fingers to blend it in. Now take MUFE HD Powder and a kabuki brush (MUFE HD Kabuki) and apply the powder. Next take Too Faced Bronzed and Poreless and a contour brush or a powder brush and flatten the bristles into a line (Sephora Collection Powder Brush) which helps to get the contour line. You want to suck in your cheeks and contour that line you get. You always want to bring it up into the temples as well as the perimeter of the face. You can also apply bronzer down the sides of your nose to make it look skinnier. Next take a light pink blush like Chanel Joues Contraste in 64 Pink Explosion and a blush brush (Too Faced Petite Pouf Brush) and apply the blush to the apples of your cheeks and blend it outward and into the bronzer. You want the blush and bronzer to be light because the main focus of this look is the eyes. Next take a luminizer like Benefit High Beam and apply it to the high points of the face, like the tops of your cheekbones, chin, cupid's bow, etc. I use my fingers to dab it in. Never rub it in. Now I take my kabuki brush and i lightly tap off the excess and make sure it's all blended in. Now take a light pink lipstick like Chanel Rouge Coco Shine in 68 Candeur and apply it to your lips. Et voila! Your look is done.


Eyes:

Too Faced Shadow Insurance
MAC Veluxe Pearl Fusion Eyeshadow in Greenluxe
Too Faced Perfect Eyes in Perfect Black
MAC Fluidline in Blitz n Glitz
MAC Zoom Fast Black Lash Mascara in Black

Brows:

Benefit Brow Zings in Light


Face:

Too Faced Primed and Poreless
MAC Select Cover-Up Concealer in NW20
MAC Studio Finish Concealer in NW20
MUFE HD Foundation in 110
MUFE HD Powder
Benefit High Beam
Chanel Joues Contraste in 64 Pink Explosion
Too Faced Bronzed and Poreless


Lips:

Chanel Rouge Coco Shine Lipstick in 68 Candeur


Products Used:


MAC Veluxe Pearl Fusion Eyeshadow in Greenluxe

MAC Veluxe Pearl Fusion Eyeshadow in Greenluxe - 48$CAD

Too Faced Perfect Eyes in Perfect Black - 25$CAD

MAC Fluidline in Blitz n Glitz

MAC Fluidline in Blitz n Glitz - 19$CAD

MAC Zoom Fast Black Lash in Black - mini shown, fullsize is 19$CAD

Benefit Brow Zings in Light

Benefit Brow Zings in Light - 36$CAD

Benefit High Beam - 32$CAD

Chanel Joues Contraste in 64 Pink Explosion

Chanel Joues Contraste in 64 Pink Explosion - 48$CAD

Too Faced Bronzed and Poreless

Too Faced Bronzed and Poreless - 38$CAD

Chanel Rouge Coco Shine Lipstick in 68 Candeur - 39$CAD

From left to right:
MAC Veluxe Pearl Fusion Eyeshadow in Greenluxe in #1,2,3,4,5
Too Faced Perfect Eyes in Perfect Black
MAC Fluidline in Blitz n Glitz
Benefit High Beam
Chanel Joues Contraste Blush in 64 Pink Explosion
Too Faced Bronzed and Poreless
Chanel Rouge Coco Shine in 68 Candeur


Thanks for reading and I hope you enjoyed this post! I'm really loving MAC's new Veluxe Pearl Fusion Eyeshadows. They look so wonderful and they're so creamy. It's definitely different than their regular line of eyeshadows. I wanted the rest of the face to be light so that the eyes could be the main focus. I love my new Chanel blush in Pink Explosion. It's baked so it goes on light but you could pack on the color if you wanted to. It's the perfect pink for me. Too Faced's Bronzed and Poreless bronzer is also amazing. I've been using it more and more lately and it's light enough for my pale skin. For medium- to dark-toned girls, it probably won't show up much, but for light girls, it's a godsend. I also really love my new Chanel Rouge Coco Shine in Candeur. It's the perfect light pink color and it's so hydrating on your lips and makes them feel soft.

So I hope you enjoyed this and please tell me how you liked or did not like MAC's Veluxe Pearl Fusion Eyeshadow in Greenluxe and in Smokeluxe too, I'm curious! And also let me know what you think of Too Faced's Bronzed and Poreless and which bronzer from their line is your favorite. And if you like Chanel like me, which blush and also which Rouge Coco Shines are your favorite?

Thanks for reading and coming up tonight/tomorrow:

Matte Black French Manicure (with Glossy Tips)

and

MAC PRO Haul


Steph xo.