Showing posts with label greensmoke. Show all posts

Friday, August 2, 2013

Dark Smokey Sparkly Green Eyes using MAC

Hello glamies!!

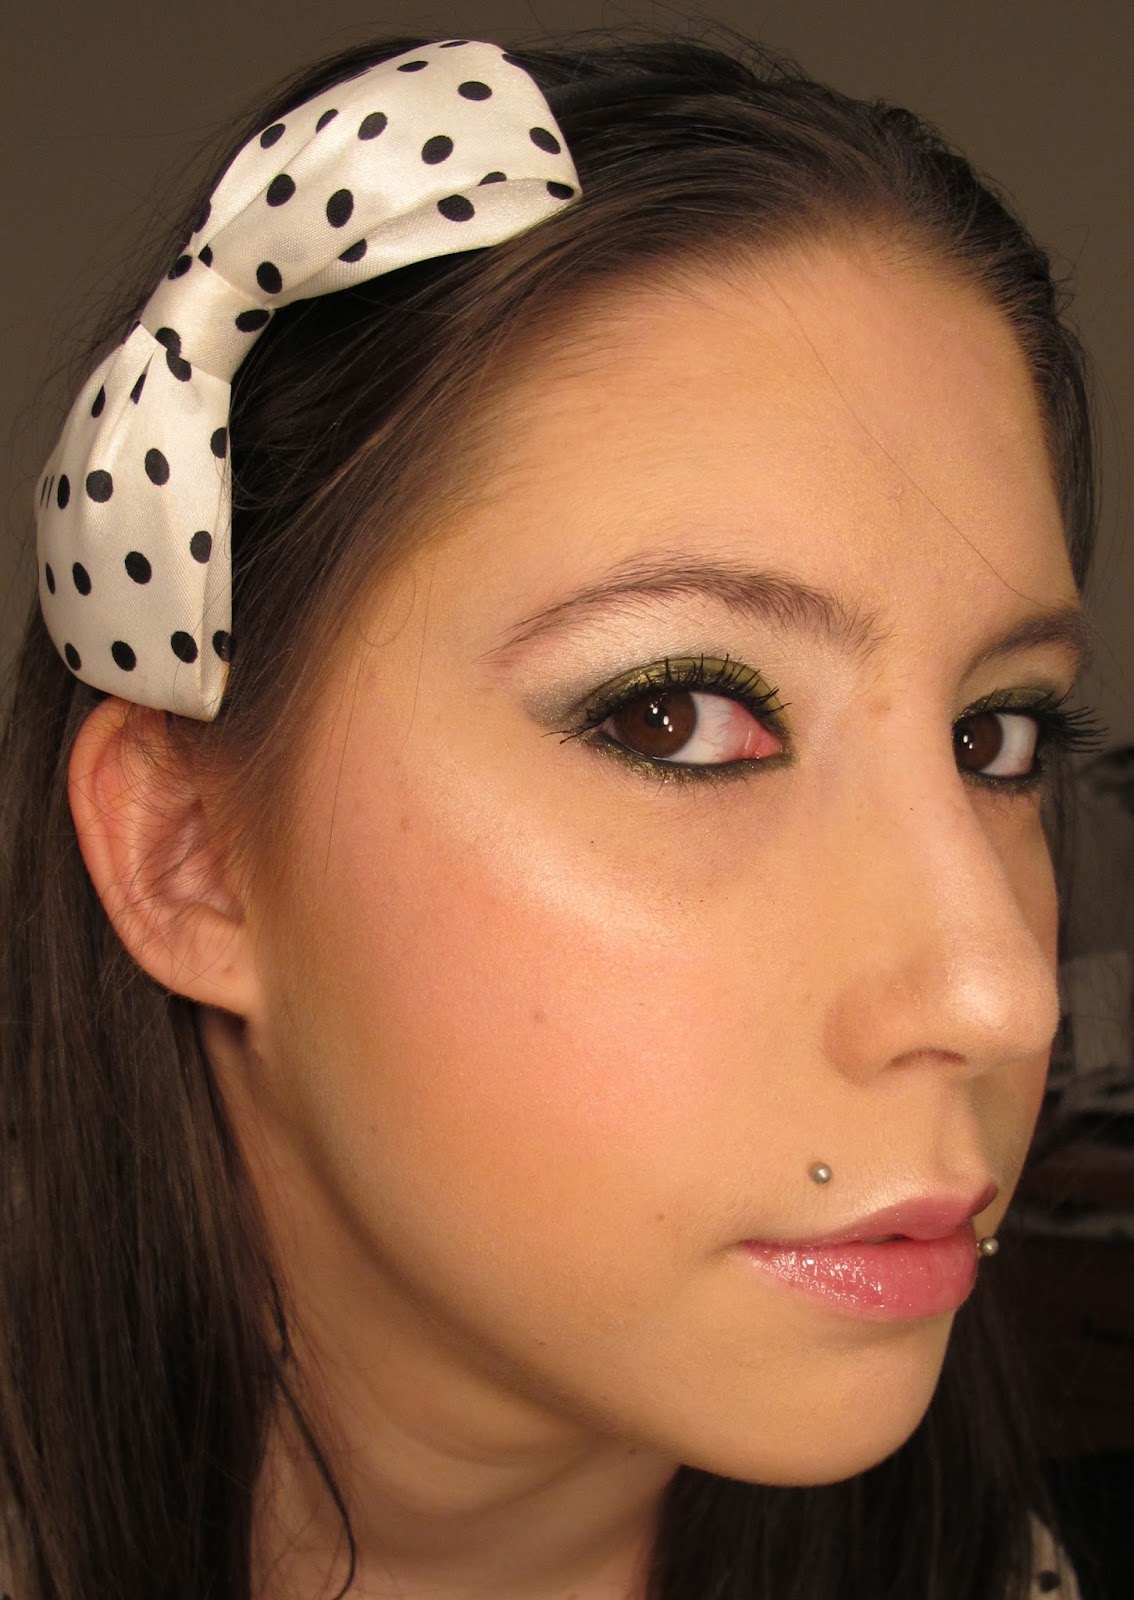
Well, this look certainly can't get any smokier. I seriously went insane and made it so smokey and dramatic. What I love about it is that it isn't your typical smokey eye, it's a dark green smokey eye that just looks stunning. I know I did a similar look on my mom, but I changed up mine completely and it looks awesome. I've only recently discovered MAC's Mineralize Eyeshadow line but I am hooked. I love love love the sparkle payoff and the fact that it actually sticks to the skin when used with a proper base. I find a lot of sparkle shadows just end up falling down and no sparkles actually stick to the eyelid. No such problems with Mineralize Eyeshadows!! Just make sure you use MAC's Paint Pots beforehand, they really make a big difference in creating a sticky base that your eyeshadow and sparkles will adhere to. Since I started using Paint Pots in the last month, I've noticed a dramatic increase. I can wear my makeup longer without it creasing!! And the color stays vibrant and as sparkly as it did upon application. I used to use Too Faced's Shadow Insurance, but I find that for anything with sparkles, you need a stronger, stickier base for it to adhere to. I also tried using Shadow Insurance before applying my Paint Pot, but I found that it made it worse! I'm guessing because it ends up slipping all over the eye?? But since I started using Paint Pots as my sole primer, I've seen a huge difference. I tend to have watery eyes and my makeup always comes off in my inner corner and going up along into the crease. Today, after 12 hours of wear, the tiniest bit of makeup in my inner corner came off. Not bad considering my lids. I'll stop rambling and get onto the look, but seriously, I love those 2 products.


Now, the trick to this look is blending. You can never blend too much.

As a sidenote, my mom went and bought some makeup for herself which I ended up stealing. She got the MAC Illustrated Face Kit by Rebecca Moses in Plum. So jeals! If I had to pick between the plum and the brown I would definitely take the plum. I found the colors were much better and also more suited to me. In this kit you get 4 eyeshadows, 1 blush, 2 lipsticks, and a double-ended brush. I'll post pics of it in an upcoming tutorial. I can't wait to use it!! She also got a couple lipsticks, I know one of them is Pervette which is her favorite lipstick ever. She got me an eyeshadow, Plumage, which is such a beautiful green. She also got Ricepaper and Sketch because she wanted to try out a look to bring out the green in her hazel eyes. She'd be using those 2 and Fig.1 which I already have. They're being housed in my palette of course. She also got me another 217 brush!! I knew mine was mangled but holy crap when I put the two together, mine was clearly shorter and fatter.Oh well, I'm still keeping it because I wanted to have two to use at the same time. She also went to Illamasqua and bought the lipgloss I was dying to buy. For herself. She kills me sometimes. It's an Intense Lipgloss in Divine. It's a bright almost neon pink and it looks bad ass. And anyways, onto the makeup look!


Dark Smokey Sparkly Green Eyes using MAC


Start by applying a dark base, I like MAC Paint Pot in Blackground because it's sticky enough for the sparkles and color from the Mineralize Eyeshadow in Smutty Green to stick on and stay the whole day. Apply this base to the lid and crease using a large shadow brush (Sephora PRO Large Shadow Brush) and make sure you get the inner corner. Take a blending brush (Sephora PRO Crease Brush) and blend out your crease. Keep blending until there are no harsh lines. If you have to, go back in and put more Blackground on your lid if it faded during blending. Again, if you get a harsh line, blend it out gently. Now take Mineralize Eyeshadow in Smutty Green and pat it onto your lid using a medium shadow brush (Sephora PRO Medium Shadow Brush). Take a blending or crease brush (MAC 217) and apply MAC Eyeshadow in Greensmoke to your crease and bring it into your inner corner. Next take MAC Eyeshadow in Vex, and using a small shadow brush (Sephora Collection All Over Shadow Brush), apply this under your brow and bring it into the corner of your eye and also use it so blend out Greensmoke. I like to go back in and blend Greensmoke again and also apply another coat of Smutty Green on my lid to make it more sparkly. For the bottom lid, I lined it with MAC Pearlglide Intense Eye Liner in Undercurrent and then I went over that with MAC Mineralize Eyeshadow in Smutty Green. I lined both top and bottom waterlines with Too Faced Perfect Eyes in Perfect Black for an extra black waterline. Finish your eyes off with a couple coats of MAC Zoom Fast Black Lash in Black. For your brows, use Benefit Brow Zings and Benefit Instant Brow Pencil to fill in your brows and create a dramatic arch so people are drawn into your captivating eyes.


Now it's time to do the rest of your face. Prime your face using Too Faced Primed and Poreless. Cover up your under eye circles with MAC Select Cover-Up Concealer in NW20 using a concealer brush (Sephora PRO Concealer Brush) and apply a foundation such as MUFE HD Foundation with a stippling brush (Sephora PRO Stippling Brush) or your method of choice. Go over any imperfections with MAC Studio Finish Concealer. Once you're happy, apply MUFE HD Powder all over your face using a kabuki brush (MUFE HD Kabuki). To contour, I used Too Faced Bronzed and Poreless with a folded powder brush (Sephora Collection Powder Brush). Suck in your cheeks as a guideline and go from the top of the ear towards the upper mouth. Also contour the perimeter of the face, the temples, the sides of the nose, etc. Apply Illamasqua Powder Blush in Nymph and a blush brush (Too Faced Powder Pouf) to the apples of your cheek and blend outwards as well as down into the contour. Apply a highlight, like Benefit High Beam, to the tops of your cheekbones, top of your brow bones, cupid's bow, etc. The finishing touch is to apply Illamasqua Lipstick in Plunge.

Eyes:

MAC Paint Pot in Blackground
MAC Mineralize Eyeshadow in Smutty Green
MAC Eyeshadow in Greensmoke
MAC Eyeshadow in Vex
Too Faced Perfect Eyes in Perfect Black
MAC Pearlglide Intense Eye Liner in Undercurrent
MAC Zoom Fast Black Lash in Black

Brows

Benefit Brow Zings in Light
Benefit Instant Brow Pencil in Medium


Face:

Too Faced Primed and Poreless
MAC Select Cover-Up Concealer in NW20
MAC Studio Finish Concealer in NW20
MUFE HD Foundation in 110
MUFE HD Powder
Benefit High Beam
Illamasqua Powder Blush in Nymph
Too Faced Bronzed and Poreless


Lips:

Illamasqua Lipstick in Plunge


Products Used:


MAC Paint Pot in Blackground

MAC Paint Pot in Blackground - 22$CAD

MAC Mineralize Eyeshadow in Smutty Green

MAC Mineralize Eyeshadow in Smutty Green - 25$CAD

MAC Eyeshadows (14.50$CAD each for palette refill) in:
Vex
Greensmoke

MAC Pearlglide Intense Eye Liner in Undercurrent - 19$CAD

Too Faced Perfect Eyes in Perfect Black - 25$CAD

MAC Zoom Fast Black Lash in Black - 19$CAD

Benefit Brow Zings in Light

Benefit Brow Zings in Light - 36$CAD

Benefit Instant Brow Pencil in Medium - 25$CAD

Benefit High Beam - 32$CAD

Illamasqua Powder Blush in Nymph

Illamasqua Powder Blush in Nymph - 26$CAD

Too Faced Bronzed and Poreless

Too Faced Bronzed and Poreless - 38$CAD

Illamasqua Lipstick in Plunge - 24$CAD

From left to right:
MAC Paint Pot in Blackground
MAC Mineralize Eyeshadow in Smutty Green
MAC Eyeshadow in Greensmoke
MAC Eyeshadow in Vex
MAC Pearlglide Intense Eye Liner in Undercurrent
Too Faced Perfect Eyes in Perfect Black
Benefit High Beam
Illamasqua Powder Blush in Nymph
Too Faced Bronzed and Poreless
Illamasqua Lipstick in Plunge


Thanks for reading and I hope you enjoyed the look! This was my own personal take on the look I had done for my mom. I just wish she would have let me post a pic of the whole look, it looked great! And I also love how mine turned out. I'm really a big fan of Mineralize Eyeshadows, I love the sparkle in them! I can't wait to try out the purple one I got, Young Punk. The green liner was also super beautiful. You really have to swatch Undercurrent to be able to see how beautiful it is. It's a color I've always overlooked until I decided to actually swatch all the green liners. I love it.

You can expect to see new posts coming soon where I'll be using a ton of the new stuff I got! Time to mix and match the new with the old! I'm still on my quest to to build the ultimate palette collection, so I want to know: What is your top 15 MAC eyeshadows? Basically, if you could build your own palette with your favorite shadows, what would they be? I'll be doing a post soon on my favorite picks, as I think it's interesting to see what different people consider their staple products.

So anywayz, hope you loved the look, as always you can comment and say what you loved or didn't love about it. I also want to hear which paint pot is your favorite and why.

Steph xo.


Monday, July 29, 2013

Green Eye Look on my Mom using MAC

Hello glam girls!!

I have so much to talk about.. and I've already written most of it in posts I was planning on publishing, but haven't, mainly because I fell asleep in my makeup before taking photos and when I finally woke up, it was smudged really badly.

I'm going to show you a face chart of a look I did on my mom today. Unfortunately, she didn't want me to post the pictures of the makeup I did. Not because she didn't like it, but because she just doesn't like putting herself out there on the internet. Especially since it was a darker look and not one that she is used to wearing everyday. She did, however, give me permission to take a photo of her eyes. I'll be showing you both the face chart and the pic of the eyes. I found the blank face chart on google and I printed it onto watercolor paper. The watercolor paper makes a HUGE difference and it enables the pigment to stay onto the paper. You can even use makeup brushes to apply the makeup onto the paper.

Since this is a bit different than my usual posts, I'll explain it detail how I did the makeup and I will list all the products I used on her. I will most likely also do the eye look on myself. I used MAC Mineralize Eyeshadow in Smutty Green, which is I just bought the other day and still haven't used on myself. I also bought Young Punk, which is also a Mineralize Eyeshadow. I also ordered a few discontinued eyeshadows online, which are: Shimmermoss and Purple Haze. I also ordered a Pro shade, Vellum. The last shade I got (in order to qualify for free shipping) was Vibrant Grape. I'll be showing all the new MAC stuff once I get my shipment. I don't like doing a bunch of small posts. I really would have liked to show more pictures, but I will definitely be doing a look using Smutty Green and Young Punk (though not necessarily together) in the near future.

So here's the look and the face chart:


Green Eye Look using MAC


To prime the eyes, use a paint pot if you have one or a sticky base if you don't. I used MAC Studio Finish Concealer in NW20 as my sticky base so that the sparkles from the Mineralize Eyeshadow would stick. It works just as good as a primer. Apply it to the entire eye area and use a blending brush to blend it out if necessary. Next, take MAC Mineralize Eyeshadow in Smutty Green and apply it to your lid using a medium eyeshadow brush. Then take MAC Eyeshadow in Greensmoke and apply it to your crease, outer V, and outer lid using a blending brush (MAC 217). Make sure you blend it all the way to your inner eye. Take MAC Eyeshadow in Shroom and apply it between your brow and your crease color and blend out the crease using a blending brush. I like to go back in and blend out Greensmoke again. Then take MAC Eyeshadow in Phloof! and apply it to the inner corners of the eyes as well as under the brow. Looking back, for an older person such as my mom, I would have used MAC Eyeshadow in Vanilla instead of Shroom and Phloof!. There's enough sparkle on the lid, we don't need more in the crease. For a young person, however, Shroom and Phloof! are great. To line the bottom lid, use MAC Eyeshadow in Humid and apply it using an angled liner brush. The last step is to apply mascara, like Too Faced Lashgasm. My mom didn't want to put on mascara because it irritates her hard contact lenses, but that is the mascara that I would have used on her.

For the face, I didn't use a primer. I forgot! But I would have used Too Faced Primed and Poreless. I then went and covered her under eye circles with MAC Select Cover-Up Concealer in NW20. This is the concealer that I normally use on myself, but it was the perfect color for her and it really hid her circles. This concealer really impressed her and she's going to buy one. I then did her foundation using MAC Studio Fix Fluid in NW18 and a foundation brush. I find that the numbering is weird, NW18 is much darker than NW20. While this didn't work for me, it was perfect for my mom. I set the foundation and concealer by using Laura Mercier Loose Setting Powder in Translucent and a powder brush. Make sure it's applied evenly all over the face. Now it's time to contour using Too Faced Bronzed and Poreless and a contour brush. Suck in your cheeks as a guide and contour under your cheekbones, on your chin, on the perimeter of the face and the temples. Then take NARS Blush in Orgasm and apply it to the apples of the cheek and blend it outward and make sure it blends into your bronzer. Then apply Benefit Watt's Up highlighter to the cupid's bow, chin, and the tops of your cheekbones. I like to apply powder on top so that it isn't as shimmery. I do think that my mom is getting a little too old to be wearing highlighter, so I probably wouldn't put this on her the next time I do her makeup. On a young person, it would look fantastic. The last step was to put on a lip liner, MAC Lip Liner in Soar, and a lipstick, Illamasqua Lipstick in Test.

Eyes:

MAC Studio Finish Concealer in NW20 (used as a base)
MAC Mineralize Eyeshadow in Smutty Green
MAC Eyeshadow in Greensmoke
MAC Eyeshadow in Shroom
MAC Eyeshadow in Phloof!
MAC Eyeshadow in Humid
Too Faced Lashgasm Mascara

Face:

MAC Select Cover-Up Concealer in NW20
MAC Studio Fix Fluid in NW18
Laura Mercier Loose Setting Powder in Translucent
Benefit Watt's Up
NARS Blush in Orgasm
Too Faced Bronzed and Poreless

Lips:

MAC Lip Liner in Soar
Illamasqua Lipstick in Test


Here are some photos of the eyes:


I hope that the post was still enjoyable. I will do a proper post along with swatches and everything when I do the look myself. I got a bunch of new products recently and I can't wait to try them all out and show you guys. I really wanted to show the whole makeup look but my mom really didn't want me to. But that's okay, I will do a look using Smutty Green in the very near future. Thanks for reading!

Steph xo.


Thursday, June 13, 2013

Olive Green Smokey Eyes using MAC and Stila plus Sephora and Disney Ariel, and MAC Sneak Peak

Hey glamour dolls!!

So I want to let you guys know that I've made a Facebook Page for myself and the blog. There will be a little box at the bottom of the page that you can click on and Like. It's not the same thing as the tiny Like box next to the twitter and google+ icons. It's the bigger box that's in the post. Or you can CLICK HERE. Thank you!

Today I was kind of torn between what kind of eyes I wanted to do. I settled on doing a nice olive green smokey eye look using the new MAC eyeshadows that my mom recently got me. For the blush and liploss, I'm using Stila's Positively Pink Set, which is their breast cancer awareness set. It is still available on Stila's website, so if you live in the USA, you can get this duo for 9$US which is a steal. If you live in Canada like me, there are certain sites that sell older makeup. My mom bought the Stila stuff, so I don't know what website she used, but trust me, there are plenty out there with old makeup crazily discounted.


Now before I really get into the makeup, have you all seen the new Sephora and Disney Princess collection? They're doing Ariel, the little mermaid!! The eyeshadow palette looks quite nice, there are a lot of greens and blues obviously, but I think I like this collection the most. This is the last collection from Sephora and Disney's partnership. I thought that Jasmine would be the best on darker women, it definetely would not have looked nice on me. I found Cinderella to be okay, but not my style. It didn't stand out to me. While I do like Ariel's palette more, I don't think this will be something I'll be buying.


And have you seen the new MAC Veluxe Pearl Fusion Shadow for Summer 2013? Obviously, I want the black smokey one!! But I actually like the look of all of them. I think the only one I wouldn't personally buy is the pastel one. I can't wait for these to come out, I am definitely going to try all of them out at the store. Looks like we've got blue, purple, brown, black, and pastel. I think this is a pretty cool idea. Now, when is the release date? I definitely need to be at my local MAC store before these all sell out!


Now, back to my makeup look of the day. I'm pretty excited about the MAC release and I also want to see the Ariel one too. I guess I brought out my inner mermaid by wearing green? Haha I don't think olive green would count though. I'm using Phloof!, Swimming, and Greensmoke on my eyes with a Stila Smudgestick Waterproof Eye Liner in Moray, which is your typical olive green color. I lined my waterlines with MAC Powerpoint Eye Pencil in Engraved and for mascara, I used MAC Zoomlash in Zoomblack as per usual. I decided to change up my face routine a bit. I'm still using Benefit High Beam, but for the cheeks I used the Stila Positively Pink Blush and the Stila Lipglaze in Splendor that came with it. The blush is a very light pink and I'm really liking it. Splendor is a limited edition lipglaze that also came in the Winter 2012 Lipglaze set. Splendor is a darker color than the blush, but is also a lovely pink. For the bronzer, I used Too Faced Bronzed and Poreless, which a matte bronzer that is lighter in color than their other bronzers.

Olive Green Smokey Eyes using MAC and Stila


Eyes:

Too Faced Shadow Insurance
MAC Eyeshadow in Phloof!
MAC Eyeshadow in Swimming
MAC Eyeshadow in Greensmoke
Stila Smudgestick Waterproof Eye Liner in Moray
MAC Powerpoint Eye Pencil in Engraved
MAC Zoomlash in Zoomblack


Face:

Too Faced Primed and Poreless
MAC Select Cover-Up Concealer in NW20
MAC Studio Finish Concealer in NW20
MUFE HD Foundation in 110
MUFE HD Powder
Benefit High Beam
Stila Positively Pink Blush
Too Faced Bronzed and Poreless


Lips:

Stila Lipglaze in Splendor


Products Used:

MAC Eyeshadows (18$CAD each) in:
Phloof!
Swimming
Greensmoke

Stila Smudgestick Waterproof Eye Liner in Moray (limited edition, from the Christmas 2012 Eyeliner Set 42$CAD)

MAC Powerpoint Eye Pencil in Engraved - 19$CAD

MAC Zoomlash in Zoomblack - mini shown, fullsize is 19$CAD

Benefit High Beam - 32$CAD

Stila Positively Pink Set - 9$US
Blush in Positively Pink
Lipglaze in Splendor

Too Faced Bronzed and Poreless

Too Faced Bronzed and Poreless - 38$CAD

From left to right:
MAC Eyeshadow in Phloof!
MAC Eyeshadow in Swimming
MAC Eyeshadow in Greensmoke
Stila Smudgestick Waterproof Eye Liner in Moray
MAC Powerpoint Eye Pencil in Engraved
Benefit High Beam
Stila Positively Pink Blush
Too Faced Bronzed and Poreless
Stila Lipglaze in Splendor


So that's my Olive Green Smokey Eyes look! I hope you liked this look. This is how I would do Olive Green. When I first did an Olive Green look, I didn't think it would look any good on me, but it does! Though it's still not anywhere near being my favorite color. Black and green are my favorite colors, but it would be a green like MAC Steamy. I hope you also liked the news I've given you. I'm pretty excited for these releases, especially the MAC one. So let me know which item or collection you're excited for and which product you're looking forward to buying or trying out!


When it comes to my look, did you like? And what did you like or not like about it? Please let me know what products you loved and which ones you didn't. Did you like the MAC eyeshadows? Did you like the Stila Smudgestick in Moray? Did you like the Stila blush and lipglaze? And did you like the Too Faced Bronzed and Poreless bronzer? Feel free to leave a comment on anything.

Steph xo.


P.S. New posts coming up:

I'm working on a couple things, so you'll see some dupes and similar products for the Too Faced Loves Sephora palette.

I'm thinking of doing a week of Sephora + Pantone Universe Foiled Eyeshadow Palette looks. That's the palette with the bronze lid that's in the shape of an Ipad lol. I know it's a little old, but I like the palette and I haven't used it in a while so... hence the week of it. A look for each column :) I also have the eyeliner set that compliments it.

I also want to do some looks using the Sephora Smokey Studio 2. So if you have a particular trio from that palette that you want to see a look made around, let me know.

You're also going to see that Stila Christmas 2012 palette, the one that looks like a star.

And new nails should be coming soon, I got annoyed of the Nails Inc Bling It On: Rebel because all the jewels would get caught on my hair. And it was a biotch to get the glue off. I still have nail polish and glue on my thumbs. Gonna have to soak my thumbs in acetone for a while again. Really pretty nails, but a pain to get off. Lesson for next time, use less glue!!

And if you have any suggestions or whatever, let me know.

Oh, and don't forget to Like the big box!! It's my new Facebook Page that will keep you updated on new posts and other stuff. And it would mean a lot to me   :)