
I don't know what's wrong with me lately, but I keep having this serious love affair with the color green. I can't help it. I'm just so addicted to it. The color green makes me so happy! Today's look is more of a teal than a green, but still counts as a green in my book. I know you're probably all fed up of green and thinking "Jesus, can't this girl do something else other than green?" Well I can. And I will. Just not today. Procrastination rules!!

Since I've been buying a ton of eyeshadow lately, I've been trying to try everything out. It might take a while with the amount of stuff I've got going on. I'll try to wrap it up with the greens for a little while so I can get onto my purples and neutrals. I've pretty much finished my neutral, green, and purple palettes. Well I'd say they are mostly finished. These are my personal colors, meaning the colors that suit me the best. Now, I'm trying to move on and get colors that don't necessarily suit me into my kit so I can seriously do makeup on other people. I've really been thinking about this lately a lot and I really do want to pursue makeup as a part time job. I hear all the time from MUAs that I'd be perfect for it. And the best thing for me, not having a makeup education, would be to work at a makeup counter, or a store like Sephora. I'm trying to expand my kit to include colors I don't have, like blues, reds, oranges, yellows, pinks, yellow- and orange-toned neutrals, etc. I also need to get a whole range of foundation and concealer colors. Ahhh! So much stuff that I need.

So about the look, I tried to use a variety of colors that I haven't used before. I used MAC Paint Pot in Painterly for the first time ever. I didn't find that it did much for this look. I thought it kind of dulled out the color compared to how I normally do my eyes, especially now that I'm looking at it at the end of the day. I use Too Faced Shadow Insurance to prime my eyes normally and then I apply the eyeshadow. But today I wanted to try out the paint pot so I used that instead of the Shadow Insurance and I don't find that the color is as bright and pigmented on my eyes, especially at the end of the day. I literally see patches. This isn't normal. I feel like I can see through the shadow. I'll definitely have to play around withPainterly a bit more to find out how to use it to its full potential. On my lid, I used a color called Shimmermoss which is now discontinued. I find the color resembles Aquadisiac but Aquadisiac is more and it is also close to Steamy, though Steamy is more green. All 3 colors are very close to one another. Plumage is a very nice dark green color. It has some blue in it. It's really nice, you have to see it. On my lips I used a lipstick from the Archie Collection and a lipglass called The Wee Coquette. I looked it up after I prepared the post and photos and it is a LE shade. However, it is still available for sale on MAC's website. It's a really nice light pink.
Exotic Teal Eyes using MAC

Start off by priming your eyes using a base such as MAC Paint Pot in Painterly. Apply it all over the eye area using a large shadow brush (Sephora PRO Large Shadow Brush). You can blend out any harsh lines. Next take MAC Shimmermoss (disc.) and a medium shadow brush (Sephora PRO Medium Shadow Brush) and apply it to the lid. Now take MAC Plumage and a crease or blending brush (MAC 217) and apply it to the crease and outer V. Take it in about 2/3 of the way in. Take an angled liner brush (Sephora PRO Angled Liner Brush) and take Plumage and make a line in your crease. Keep going until you get to the end of your crease color and use it to make sure that it blends outward nicely. You want it to have a nice precise starting point. Now take MAC Shroom and a blending brush (MAC 217) and apply it above Shimmermoss and Plumage as a highlight. You can even blend into Plumage and down towards the inner eye. Now take MAC Powerpoint Eye Pencil in So There Jade and line the top lid. Also line the inner corner of the bottom lid. Take MAC Pearlglide Intense Eye Liner in Undercurrent and line the bottom lid and waterline. Take Shimmermoss and go over the bottom lid where So There Jade was applied. Do the same with Plumage and go over Undercurrent. This locks in the eyeliner and blends the color nicely. Take MAC Powerpoint Eye Pencil in Engraved and line the upper waterline. Apply MAC Zoomlash Mascara in Zoomblack to your top lashes. Draw in your brows ever so lightly using Benefit Instant Brow Pencil in Medium. Your eyes are done now! Let's do the rest of the face.
Apply a primer like Too Faced Primed and Poreless to your whole face. Apply MAC Select Cover-Up Concealer to hide your under eye circles using a concealer brush (Sephora PRO Concealer Brush). Then apply a foundation like MUFE HD Foundation to your whole face using a stippling brush (Sephora PRO Stippling Brush) or your method of choice. If there are any pimples or redness showing, apply MAC Studio Finish Concealer over them with your fingers. Use MUFE HD Powder and a kabuki brush (MUFE HD Kabuki) to set the foundation and concealer all over your face. Now it's time to contour your face using Too Faced Bronzed and Poreless and a contour brush or a powder brush that's been squished down to form a line (Sephora Collection Powder Brush). Yes I know I need a contour brush. You want to apply the bronzer to the perimeter of the face, suck in your cheeks as a guide and follow the line from the top/middle of your ear and follow it down towards your upper lip. Also apply to your temples and if you want to thin your nose, down the sides of it. Next apply Illamasqua Powder Blush in Nymph to your cheeks and blend outward and down into the contour. I skipped luminizer today. Now apply MAC Lipstick in Girl Next Door (LE) and put MAC Lipglass in The Wee Coquette on top. Now the look is done and you look fabulous!

Eyes:
MAC Paint Pot in Painterly
MAC Eyeshadow in Shimmermoss (discontinued)
MAC Eyeshadow in Plumage
MAC Eyeshadow in Shroom
MAC Powerpoint Eye Pencil in So There Jade
MAC Pearlglide Intense Eye Liner in Undercurrent
MAC Powerpoint Eye Pencil in Engraved
MAC Zoomlash in Zoomblack
Brows
Benefit Instant Brow Pencil in Medium


Face:
Too Faced Primed and Poreless
MAC Select Cover-Up Concealer in NW20
MAC Studio Finish Concealer in NW20
MUFE HD Foundation in 110
MUFE HD Powder
Illamasqua Powder Blush in Nymph
Too Faced Bronzed and Poreless


Lips:
MAC Lipstick in Girl Next Door (LE)
MAC Lipglass in The Wee Coquette (LE)

Products Used:
 |
| MAC Paint Pot in Painterly |
 |
| MAC Paint Pot in Painterly - 22$CAD |
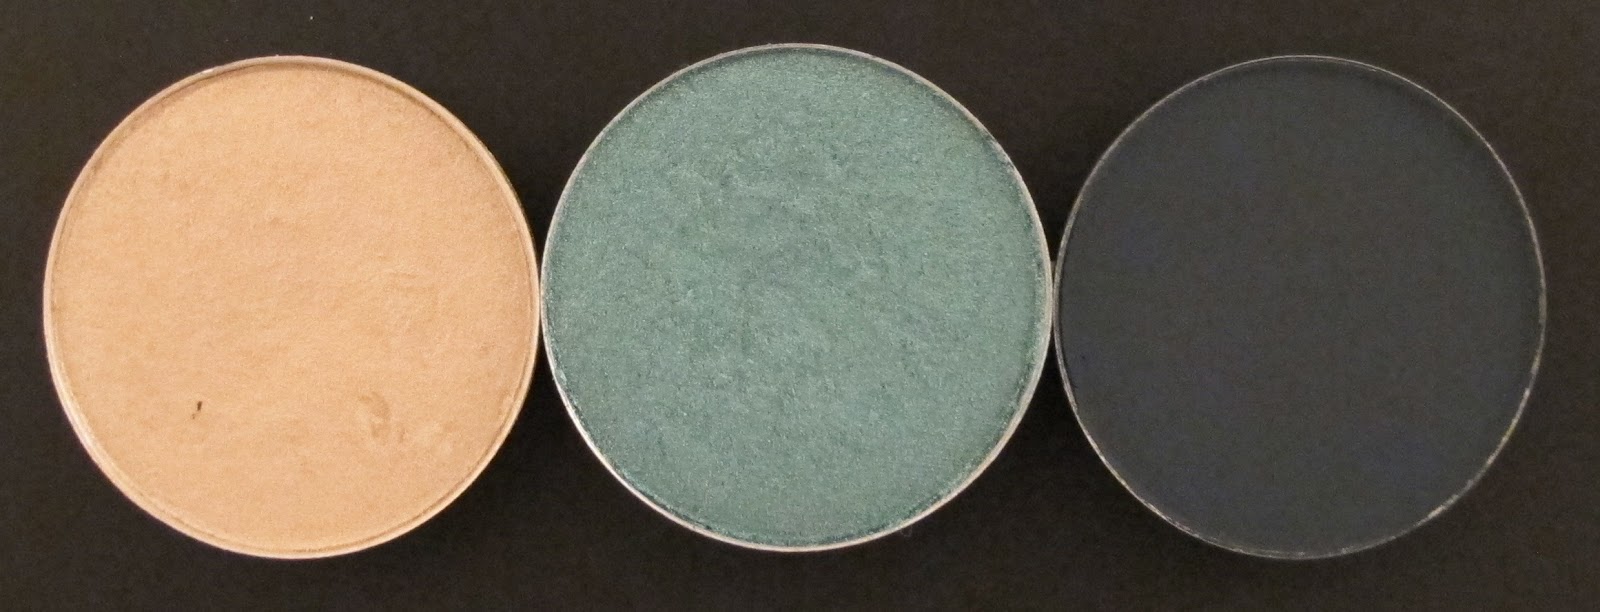 |
| MAC Eyeshadows (14.50$CAD each for palette refill) in: Shroom Shimmermoss (disc.) Plumage |
| MAC Powerpoint Eye Pencil in So There Jade - 19$CAD |
| MAC Pearlglide Intense Eye Liner in Undercurrent - 19$CAD |
| MAC Powerpoint Eye Pencil in Engraved - 19$CAD |
 |
| MAC Zoomlash in Zoomblack - mini shown, fullsize is 19$CAD |
| Benefit Instant Brow Pencil in Medium - 25$CAD |
 |
| Illamasqua Powder Blush in Nymph |
 |
| Illamasqua Powder Blush in Nymph - 26$CAD |
 |
| Too Faced Bronzed and Poreless |
 |
| Too Faced Bronzed and Poreless |
 |
| MAC Lipstick in Girl Next Door (LE) - 18$CAD |
 |
| MAC Lipglass in The Wee Coquette (LE) - 18$CAD |
 |
| From left to right: MAC Paint Pot in Painterly MAC Eyeshadow in Shroom MAC Eyeshadow in Shimmermoss (disc.) MAC Eyeshadow in Plumage MAC Powerpoint Eye Pencil in So There Jade MAC Pearlglide Instant Eye Liner in Undercurrent MAC Powerpoint Eye Pencil in Engraved Illamasqua Powder Blush in Nymph Too Faced Bronzed and Poreless MAC Lipstick in Girl Next Door (LE) MAC Lipglass in The Wee Coquette (LE) |

Thanks for reading and I hope you enjoyed today's post!! I promise to be done with the greens/teals for a little while. I really liked Shimmermoss, though I am a fan of teals. It is similar to Aquadisiac and Steamy so I guess I can see why it's been discontinued, though they each have something special to them. Plumage is such a killer green and it's too bad it didn't appear as vibrant as it should. Maybe I put too much Painterly on?? I really wasn't impressed with it, I have to say. It crumbled after 8 hours of wear and earlier. I found that the shadow kept fading throughout the day and this has never been an issue for me before. On the other hand, when I wear Blackground Paint Pot with a Mineralize Eyeshadow it really helps the color and sparkles to adhere and I get no fading problems with it. So maybe Painterly would work better with a glitter shade. I'm still going to try to find a use for it and figure it out. Hopefully Bare Study will give me less problems.
I really do like all the eyeliners I used. I find MAC has such an incredible range of good colors. I really need to check out all their different types of liner. The Illamasqua blush in Nymph is a gorgeous pink and it's super pigmented. I love it. I also keep falling more and more in love with Too Faced Bronzed and Poreless. I used to love Pink Leopard but I'm really loving Bronzed and Poreless to give me a summer glow. And finally the MAC lipstick and lipgloss are each lovely colors. They're both light pink with blue undertones. Get these if you still can.
So I want to leave you with a few questions. Do you like MAC Paint Pots? Which is your favorite one and why? Which is your most favorite MAC Eyeshadow that has been discontinued that you would want in your hands?
Steph xo.
No comments:
Post a Comment